About This Series
This “Android Kotlin Basics” blog series is all about fundamentals. We’ll take a look at the basics of building Android apps with Kotlin from the SUPER basics, to the standard basics, to the not-so-basics. We’ll also be drawing comparisons to how things are done in Kotlin vs. Java and some other programming languages to build Android apps (like C# and Xamarin or JavaScript/TypeScript for Hybrid implementations).
Check Out the Pluralsight Course!
If you like this series, be sure to check out my course on Pluralsight – Building Android Apps with Kotlin: Getting Started where you can learn more while building your own real-world application in Kotlin along the way. You can also join the conversation and test your knowledge throughout the course with learning checks through each module!
Watch it here: https://app.pluralsight.com/library/courses/building-android-apps-kotlin-getting-started/table-of-contents
RecyclerView and Adapters
RecyclerViews are the latest way to display a dynamic collection of data in Android and are what have begun to replace the ListView control. This is because of their built in pattern to “recycle” views… the name makes sense. It also allows for more flexibility in layout and display which we will also talk about here.
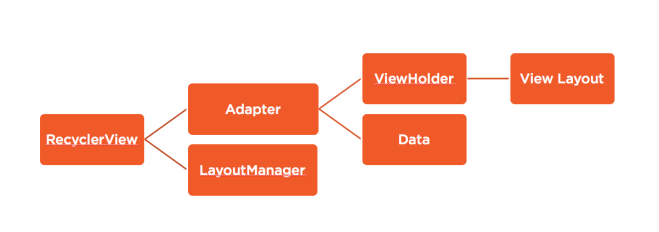
In order to use a RecyclerView, you need at least the 4 main parts
1. The RecyclerView itself
2. The Adapter to control what data is tied to what view in the recycler.
3. The ViewHolder to control what view is being used within the recycler
4. The LayoutManager to determine how to layout each view in the recycler.
Together, this relationship looks like this:

Meaning the RecyclerView needs it’s two root components set – the LayoutManager and Adapter. The adapter then uses the ViewHolder and appropriate data to manipulate the RecyclerView, and the ViewHolder uses an underlying Layout Resource to inflate the view.
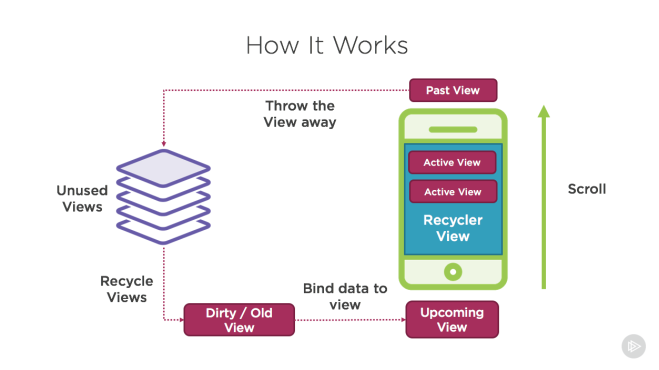
In the end the process looks like this:

Where a user scrolls the list, and as items fall out the top or bottom, they are recycled, cleaned, then re-hydrated with new data from the adapter.
So let’s break down an example of building one of these in Kotlin!
Create a RecyclerView in Your Activity
Let’s first create a simple layout for our MainActivity:
res/layout/activity_main.xml
    <RelativeLayout
        android:layout_width="match_parent"
        android:layout_height="match_parent">
        <android.support.v7.widget.RecyclerView
            android:id="@+id/article_recycler_view"
            android:layout_width="match_parent"
            android:layout_height="match_parent"/>
    </RelativeLayout>
Then using the Kotlin Android Extensions talked about here: Android Kotlin Basics – Auto-mapping Views we can reference our RecyclerView by its id property.
MainActivity.kt
class MainActivity : Activity() {
     override fun onCreate(savedInstanceState: Bundle?) {
        super.onCreate(savedInstanceState)
        setContentView(R.layout.activity_main)

        article_recycler_view.adapter = ??? // we need to create an adapter!
        article_recycler_view.layoutManager = LinearLayoutManager(context)
        // note that in Java we would have to call .setLayoutManager, but Kotlin auto-maps this to a property
     }
}
We’ll come back to this MainActivity once we’ve created our Adapter. But for now we can use the pre-built LinearLayoutManager which will layout the subsequent recycled views Linearly (vertically by default, but it can be set to Horizontal as well).
Create a CardView and ViewHolder
Let’s create the layout resource for our actual article card items, and the ViewHolder to represent it.
res/layout/article_card_item.xml
<?xml version="1.0" encoding="utf-8"?>
<RelativeLayout xmlns:android="http://schemas.android.com/apk/res/android"
    android:layout_width="match_parent"
    android:layout_height="wrap_content"
    xmlns:app="http://schemas.android.com/apk/res-auto">

    <android.support.v7.widget.CardView
        android:layout_height="wrap_content"
        android:layout_width="match_parent"
        android:layout_margin="16dp"
        android:layout_alignParentTop="true"
        android:layout_centerInParent="true"
        android:background="@android:color/white"
        app:cardElevation="4dp">
        <LinearLayout
            android:orientation="vertical"
            android:layout_width="match_parent"
            android:layout_height="wrap_content"
            android:layout_margin="16dp">
            <ImageView
                android:id="@+id/article_image"
                android:layout_width="match_parent"
                android:layout_height="wrap_content"
                android:src="@drawable/ic_image_black_24dp"/>
            <TextView
                android:id="@+id/article_title"
                android:layout_width="match_parent"
                android:layout_height="wrap_content"
                android:layout_marginTop="8dp"
                android:gravity="center"
                android:textAlignment="center"
                android:text="Hello World!"/>
        </LinearLayout>
    </android.support.v7.widget.CardView>
</RelativeLayout>
This is a simple card with an image and title in it that looks something like this:

And with our view, we will need to create a ViewHolder that our Adapter will use to stick data in it:
CardHolder.kt
class CardHolder(itemView: View) : RecyclerView.ViewHolder(itemView) {
    private val articleImageView: ImageView = itemView.findViewById<ImageView>(R.id.article_image)
    private val titleTextView: TextView = itemView.findViewById<TextView>(R.id.article_title)

    private var currentPage: WikiPage? = null

    fun updateWithPage(page: WikiPage){
        currentPage = page

        titleTextView.text = page.title

        // load image lazily with picasso
        if(page.thumbnail != null)
            Picasso.with(itemView.context).load(page.thumbnail!!.source).into(articleImageView)
    }
}
So here we create a ViewHolder subclass called CardHolder that references its ImageView and TextView that can be initialized right away by querying the passed in itemView property from the constructor. We also add a convenience function to update the ViewHolder and it’s included views with a given WikiPage model (this model is what represents an article from Wikipedia and looks something like this:
WikiPage.kt
class WikiPage {
    var pageid: Int? = null
    var title: String? = null
    var fullurl: String? = null
    var thumbnail: WikiThumbnail? = null
}
WikiThumbnail
class WikiThumbnail {
    val source: String? = null
}
This model is the datatype our Adapter will reference as well.
Lastly, I added a quick reference the the Picasso Library from Square in order to load an image from the thumbnail url into our ImageView.
Creating an Adapter
Now the last thing we need to do is connect our ViewHolder and Data to our RecyclerView by creating our Adapter. Here’s what that will look like:
ArticleCardRecyclerAdapter.kt
class ArticleCardRecyclerAdapter() : RecyclerView.Adapter<CardHolder>() {
    val currentResults: ArrayList<WikiPage> = ArrayList<WikiPage>()

    override fun getItemCount(): Int {
        return currentResults.size
    }

    override fun onBindViewHolder(holder: CardHolder?, position: Int) {
        var page = currentResults[position]
        holder?.updateWithPage(page)
    }

    override fun onCreateViewHolder(parent: ViewGroup?, viewType: Int): CardHolder {
        var cardItem = LayoutInflater.from(parent?.context).inflate(R.layout.article_card_item, parent, false)
        return CardHolder(cardItem)
    }
}
You can see our ArticleCardRecyclerAdapter inherits from the RecyclerView.Adapter and passes in our CardHolder view holder we just created as the type of ViewHolder. This allows for our required override functions to use that CardHolder as its type.
The adapter requires only 3 functions to be overridden, but there are also other functions available to override.
The three required are:
– getItemCount() to return the number of items the RecyclerView will have within it
– onBindViewHolder() to bind the data of a given position to the CardHolder. Here is where we call that updateWithPage function we created in our CardHolder class.
– onCreateViewHolder() to create the initial view holder by inflating a given layout file (which we use to inflate the article_card_item.xml file.
Now that we have our adapter, we can go and update our MainActivity:
MainActivity.kt
class MainActivity : Activity() {
     override fun onCreate(savedInstanceState: Bundle?) {
        super.onCreate(savedInstanceState)
        setContentView(R.layout.activity_main)
        val adapter = ArticleCardRecyclerAdapter()
        adapter.currentResults = ArrayList<WikiPage>()..... // you should load your cards here!
        article_recycler_view.adapter = adapter
        article_recycler_view.layoutManager = LinearLayoutManager(context)
        // note that in Java we would have to call .setLayoutManager, but Kotlin auto-maps this to a property
     }
}
Now you should be able to run and see your list of cards if you’ve loaded a collection of WikiPage models into your currentResults property on the adapter.
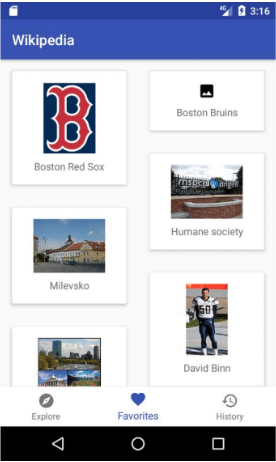
Now we can also change the layoutManager property of our recycler to something that might fit our smaller cards a bit better such as the StaggeredGridLayoutManager.
article_recycler_view.layoutManager = StaggeredGridLayoutManager(2, StaggeredGridLayoutManager.VERTICAL)
This means we want 2 columns and we want to stack the cards vertically within those columns. If the direction is switched to HORIZONTAL then the number before it will represent the number of rows instead of columns.
Then with that we can have a view like this!

And that’s pretty cool!
Also, let me know what else you’d like to learn about with Android and Kotlin! Either drop a comment here or tweet at me @Suave_Pirate!
If you like what you see, don’t forget to follow me on twitter @Suave_Pirate, check out my GitHub, and subscribe to my blog to learn more mobile developer tips and tricks!
Interested in sponsoring developer content? Message @Suave_Pirate on twitter for details.

Good
LikeLike