Xamarin.Basics – Ad Hoc iOS Builds, Part 2a: Publishing in HockeyApp

Before Getting Started

Before learning how to upload your iOS builds to HockeyApp, be sure to check out Part 1 of this series: Xamarin.Basics – Ad Hoc iOS Builds, Part1: Certificates and Profiles to learn about the requirements for producing Ad Hoc builds that will be distributed in HockeyApp.

Quick Intro

Up to this point, we should have everything we need to build our iOS application in Release/Ad Hoc mode to produce an .ipa file. This output .ipa is what we will be uploading to HockeyApp and other distribution channels such as Mobile Center. It’s important to note that HockeyApp is actually on its way out the door and being booted by the new Visual Studio Mobile Center produced by Microsoft after acquiring HockeyApp and their team. At this point, Mobile Center is still in Preview, so if you’re looking for a production ready solution for the time being, stay here. If not, follow my next blog post (to be posted here) on doing this in Mobile Center.

Building

Now that we have our Distribution Certificate and Ad Hoc Provisioning Profile created in the Apple Developer Portal and downloaded on our Mac, we can move into Visual Studio and build our Application for Ad Hoc Release. The screenshots you’ll see below will be from Visual Studio 2017 on Windows, but the same principles apply to Visual Studio for Mac.

Ensure your Bundle Identifiers Match

In the Apple Developer portal, we created an App ID and in this definition, we set a Bundle Identifier. This ID needs to match the ID of our actual application. You can set the Bundle Identifier in the Info.plist file of your iOS project in Visual Studio.

Screen Shot 2017-07-12 at 1.54.00 PM

Set Build Configuration to Release – iPhone

Screen Shot 2017-07-12 at 2.07.06 PM

In order to build for iOS Ad Hoc distribution, you’ll need to build against an actual iOS device. Building for simulators does some things differently behind the scenes that makes it faster to install in a simulator. Since our app needs to run against devices, we need to build against a real device. We also need to build in Release mode since we shouldn’t be debugging an Ad Hoc build.

Double Check Your Bundle Signing

Before building, double check that your app is going to use the proper Signing Identity and Provisioning Profile. You can do this by opening the Properties (“Options” if your in VS for Mac) and go to the Bundle Signing tab. Here you can explicitly set a Profile and Certificate to use or let it automatically choose the profile and hope it works out.

Screen Shot 2017-07-12 at 2.12.12 PM.png

Build and Deploy

Now simply build and deploy your app by right clicking the project in the Solution Explorer and clicking the Deploy option.
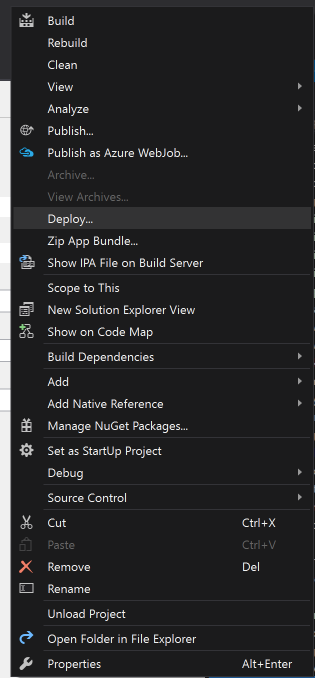
Screen Shot 2017-07-12 at 2.21.49 PM

This will now create the .ipa file in your bin. Locate your .ipa at YOUR_IOS_PROJECT\bin\Ad-Hoc\YOUR_BUNDLE.ipa. This .ipa is what will be uploaded to HockeyApp and distributed.

Using HockeyApp

HockeyApp has some great getting started documentation for creating your app and also viewing crash reports etc. You can find that here: https://support.hockeyapp.net/kb.

We will focus on uploading a new build using the .ipa file we created. In order to do this, you will need to have created an account with HockeyApp and created an iOS Alpha or Beta application slot.

From here you can click on the Add Version button which will then prompt you to upload your .ipa file.

Screen Shot 2017-07-12 at 2.39.05 PMScreen Shot 2017-07-12 at 2.39.12 PM

Now you’ll be able to add some release notes to your version that is being uploaded. Then enable the people who are allowed to install your app and send them notifications.

Once this is done, your users whose devices are registered by their UDID to the Apple Developer Portal and the Provisioning Profile used will be able to download and install it through the HockeyApp mobile website!

With your users having their hands on the app, you’ll be able to view crash reports, respond to feedback and more through the HockeyApp portal!

Next Steps

Now that we’ve been able to manually upload builds to HockeyApp, we’ll be able to look at using Continuous Integration and Deployment to distribute our new versions as we commit our changes in the source code. James Montemagno has a great blog post in the official Xamarin blog here: https://blog.xamarin.com/continuous-integration-for-ios-apps-with-visual-studio-team-services/.

In a following post, we will look at the future of deploying our iOS applications internally by using the new Visual Studio Mobile Center.

If you like what you see, don’t forget to follow me on twitter @Suave_Pirate, check out my GitHub, and subscribe to my blog to learn more mobile developer tips and tricks!

Interested in sponsoring developer content? Message @Suave_Pirate on twitter for details.

Xamarin.Tips – Calling Platform-Specific Code from a Portable Class Library – Xamarin.Forms DependencyService

For those who just want code: https://github.com/SuavePirate/Xamarin.HockeyApp.Portable

For those who just want the video: [VIDEO] Xamarin.Tips: Calling Platform-Specific Code from a PCL (Xamarin.Forms DependencyService)

As we develop our applications to be cross-platform, we try to share as much code between different platforms as possible. Many times, though, we have a need to call platform-specific code from that shared code; whether it be something such as playing a sound file, handling hardware readings, or using a third-party SDK that isn’t abstracted to be shareable.

In these examples, we will look at implementing parts of the HockeyApp SDK that are specific to the platform you are running against such as showing the Feedback control to ask your users to report bugs or give feedback.

There are a few ways to accomplish this, but in this post, we will look at using the Xamarin.Forms DependencyService.

The Xamarin.Forms DependencyService allows us to register implementations in our platform code as the implementation of an interface defined in our shared code. We can then use the Get() method from the DependencyService to get a reference to the platform code in our shared code.

To start, in our shared code, we will create an interface that will be implemented on our platforms:

public interface IHockeyService
{
    void Init();
    void GetFeedback();
}


Now in our platform projects, we will implement our IHockeyService. The important thing to note is the assembly level attribute tag we put over our namespace. This tag is what registers our implementation to the Dependency Service!

iOS:

[assembly: Xamarin.Forms.Dependency(typeof(HockeyService))]
namcespace YOUR_NAMESPACE
{
    public class HockeyService : IHockeyService
    {
        public HockeyService()
        {
        }

        public void GetFeedback()
        {
            BITHockeyManager.SharedHockeyManager.FeedbackManager.ShowFeedbackListView();
        }

        public void Init()
        {
            var manager = BITHockeyManager.SharedHockeyManager;
            manager.Configure("HOCKEY_APP_ID");
            manager.StartManager();
        }
    }
}

Android:

[assembly: Xamarin.Forms.Dependency(typeof(HockeyService))]</pre>
namcespace YOUR_NAMESPACE
{
    public class HockeyService : IHockeyService
    {
        private const string HOCKEYAPP_KEY = "HOCKEY_APP_ID";
        private readonly Android.App.Application _androidApp;
        private readonly Activity _context;

        public HockeyAppService(Activity context, Android.App.Application androidApp)
        {
            _context = context;
            _androidApp = androidApp;
        }

        public void GetFeedback()
        {
            FeedbackManager.ShowFeedbackActivity(_context.ApplicationContext);
        }

        public void Initialize()
        {
            CrashManager.Register(_context, HOCKEYAPP_KEY);
            MetricsManager.Register(_androidApp, HOCKEYAPP_KEY);
            UpdateManager.Register(_context, HOCKEYAPP_KEY);
            FeedbackManager.Register(_context, HOCKEYAPP_KEY);
        }
    }
}

Now we need to initialize the HockeyApp manager from our shared code.

App.xaml.cs

public App ()
{
    DependenyService.Get<IHockeyService>().Init();
}

Now that our service is registered to the DependencyService, we can make calls to it from our Shared code. In this example, we will add a button to a Xamarin.Forms page with a click handler that calls the service:

<?xml version="1.0" encoding="utf-8" ?>
<ContentPage xmlns="http://xamarin.com/schemas/2014/forms" xmlns:x="http://schemas.microsoft.com/winfx/2009/xaml" x:Class="YourNamespace.MainPage">

    <Button Text="Get feedback with the dependency service!"
            VerticalOptions="Center"
            HorizontalOptions="Center"
            Clicked="Feedback_Clicked"/>

</ContentPage>

public partial class MainPage : ContentPage
{
    public MainPage()
    {
        InitializeComponent();
    }

    private void Feedback_Clicked(object sender, EventArgs e)
    {
        DependencyService.Get<IHockeyService>().GetFeedback();
    }
}

Now our results will show that our shared code call to the service successfully shows the HockeyApp UI

simulator-screen-shot-feb-15-2017-1-47-26-pm

Xamarin.Tips – Calling Platform-Specific Code from a Portable Class Library – The Singleton Method

For those who just want code: https://github.com/SuavePirate/Xamarin.HockeyApp.Portable

For those who just want the video: [VIDEO] Xamarin.Tips: Calling Platform-Specific Code from a PCL (Singleton Method)

As we develop our applications to be cross-platform, we try to share as much code between different platforms as possible. Many times, though, we have a need to call platform-specific code from that shared code; whether it be something such as playing a sound file, handling hardware readings, or using a third-party SDK that isn’t abstracted to be shareable.

In these examples, we will look at implementing parts of the HockeyApp SDK that are specific to the platform you are running against such as showing the Feedback control to ask your users to report bugs or give feedback.

There are a few ways to accomplish this, but in this post, we will look at using the Singleton Method.

The Singleton Method is where we create a universal Singleton in our shared code that is initialized in our platform code, and then called from our shared code.

To start, in our shared code, we will create an interface that will be implemented on our platforms:

public interface IHockeyService
{
    void Init();
    void GetFeedback();
}

Then we create our actual Singleton in our shared code:

public class HockeyManager
{
    public static IHockeyService Current;
}

Now in our platform projects, we will implement our IHockeyService:

iOS:

public class HockeyService : IHockeyService
{
    public HockeyService()
    {
    }

    public void GetFeedback()
    {
        BITHockeyManager.SharedHockeyManager.FeedbackManager.ShowFeedbackListView();
    }

    public void Init()
    {
        var manager = BITHockeyManager.SharedHockeyManager;
        manager.Configure("HOCKEY_APP_ID");
        manager.StartManager();
    }
}

Android:

public class HockeyService : IHockeyService
{
    private const string HOCKEYAPP_KEY = "HOCKEY_APP_ID";
    private readonly Android.App.Application _androidApp;
    private readonly Activity _context;

    public HockeyAppService(Activity context, Android.App.Application androidApp)
    {
        _context = context;
        _androidApp = androidApp;
    }

    public void GetFeedback()
    {
        FeedbackManager.ShowFeedbackActivity(_context.ApplicationContext);
    }

    public void Initialize()
    {
        CrashManager.Register(_context, HOCKEYAPP_KEY);
        MetricsManager.Register(_androidApp, HOCKEYAPP_KEY);
        UpdateManager.Register(_context, HOCKEYAPP_KEY);
        FeedbackManager.Register(_context, HOCKEYAPP_KEY);
    }
}

Now we need to initialize our Singleton from our platform-specific code. In iOS, we will do this in our AppDelegate, and in Android – our MainActivity:

iOS

public override bool FinishedLaunching(UIApplication app, NSDictionary options)
{
    HockeyManager.Current = new HockeyService();
    global::Xamarin.Forms.Forms.Init();
    LoadApplication(new App());

    return base.FinishedLaunching(app, options);
}

Android:

protected override void OnCreate(Bundle bundle)
{
    TabLayoutResource = Resource.Layout.Tabbar;
    ToolbarResource = Resource.Layout.Toolbar;
    base.OnCreate(bundle);
    HockeyManager.Current = new HockeyService(this, Application);
    global::Xamarin.Forms.Forms.Init(this, bundle);
    LoadApplication(new App());
}

Now we need to initialize the HockeyApp manager from our shared code.

App.xaml.cs

public App ()
{
    HockeyManager.Current.Init();
}

Now that our Singleton is created, we can make calls to it from our Shared code. In this example, we will add a button to a Xamarin.Forms page with a click handler that calls the service:

<?xml version="1.0" encoding="utf-8" ?>
<ContentPage xmlns="http://xamarin.com/schemas/2014/forms" xmlns:x="http://schemas.microsoft.com/winfx/2009/xaml" x:Class="YourNamespace.MainPage">

    <Button Text="Get feedback with a singleton!"
            VerticalOptions="Center"
            HorizontalOptions="Center"
            Clicked="Feedback_Clicked"/>

</ContentPage>
public partial class MainPage : ContentPage
{
    public MainPage()
    {
        InitializeComponent();
    }

    private void Feedback_Clicked(object sender, EventArgs e)
    {
        HockeyManager.Current.GetFeedback();
    }
}

Now our results will show that our shared code call to the Singleton successfully shows the HockeyApp UI

simulator-screen-shot-feb-15-2017-1-47-26-pm