Introducing Suave Streams

Welcome to Suave Streams at https://twitch.tv/suave_pirate where I’ll be taking some time twice a week to build some of the coolest, funniest, and also innovative pieces of software using real-world patterns, practices, and tools.

Come for a laugh, come to build, and come to learn! We’ll be jumping into languages, and tools like:

  • C#
  • TypeScript
  • Kotlin
  • Swift
  • ASP.NET Core
  • Alexa Skills
  • Actions on Google
  • Bixby Capsules
  • Conversational AI
  • Real time communications
  • Xamarin/Maui.NET
  • UWP
  • Game Development
  • Bot building

and so much more!

We’re starting off with a schedule of every:

  • Sunday 12:30-4:30PM EST
  • Wednesday 6-10PM EST

I hope you’ll join for our first ever livestream this Sunday, May 22nd at 12:30pm EST where we are starting to build an Alexa Skill to Beat Call of Duty Warzone! Using:

C#, ASP.NET Core APIs, SignalR, UWP, Alexa Skills SDK, and scalable architectures and design patterns to make it come to life.

After each stream, I’ll also be uploading the whole recording (with minor edits) to my YouTube over at https://www.youtube.com/channel/UC1ycVqsWOInQuel68295M7w

So if you can’t make the stream, you won’t miss out on all the fun. Be sure to follow me on twitch for updates on when I go live and to keep up with the projects we start creating!

See you there!


HACKMIT 2019 This Weekend!

HackMIT is this weekend, September 14-15th.

I’m happy to announce that I’ll be mentoring as one of the local Microsoft MVPs that were invited to help as part of the Microsoft sponsorship of the event. I look forward to building some incredible applications with some of the brightest students coming to Cambridge! Hack for a reason 🙂

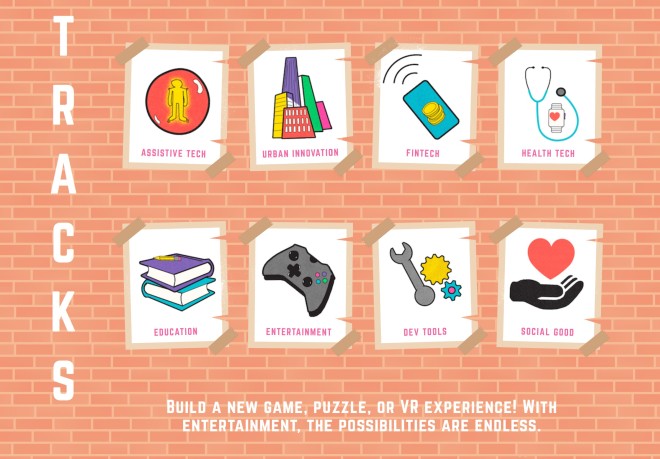
Check out some of the awesome tracks:

hackmit_tracks


If you’re hacking this weekend, come find me for help with:

  • Conversational AI
  • Voice First Development
  • Azure
  • AWS
  • Machine Learning
  • Unity
  • C#
  • JavaScript/TypeScript
  • Kotlin
  • React
  • Video Editing
  • and RTC

See ya’ll there!


If you like what you see, don’t forget to follow me on twitter @Suave_Pirate, check out my GitHub, and subscribe to my blog to learn more mobile developer tips and tricks!

Interested in sponsoring developer content? Message @Suave_Pirate on twitter for details.
Xamarin.Tip – Add Easter Eggs to UWP with Key Combos

In a previous post, I talked about adding easter eggs to your iOS and Android applications (using Xamarin.Forms or Xamarin Native) using the shake gesture – allowing us to execute it within the context of the current view we are in whether native or in forms, and then from there execute any bit of code we want!

Check that out here: Xamarin.Tip – Add Easter Eggs on Shake

In this post, I want to give an example of adding the same sort of functionality to your UWP applications. This again is usable whether in Xamarin.Forms or native UWP.

Since nearly all UWP devices are PC’s and not mobile devices, and often don’t have gyrometers, adding this type of feature using a shake gesture just doesn’t make sense. I propose, instead, to use key combos!

Tracking Key Combinations in UWP and Xamarin.Forms

In UWP there are two main things needed to track key combinations – the KeyState and the OnKeyUp method.

Accessing the current KeyState is as easy as:

CoreWindow.GetForCurrentThread().GetKeyState(VirtualKey.Control);

Where VirtualKey.Control can be any key! In this case it is the Ctrl key.

In our UWP Page classes, we can also override the OnKeyUp method which is fired whenever any key is pressed. This means that in this method, we can check the KeyState of any number of keys, and also get the current key that was just pressed. Alternatively, you can do this in the OnKeyDown override depending on how you want it to behave.

Let’s look at a full example of this implemented where we want to fire some Easter Egg off once the Ctrl + E key combo is hit:

MainPage.xaml.cs

// NOTE: this is the UWP MainPage - not the Xamarin.Forms MainPage!
public sealed partial class MainPage
{
    public MainPage()
    {
        this.InitializeComponent();
    }

    private static bool IsCtrlKeyPressed()
    {
        var ctrlState = CoreWindow.GetForCurrentThread().GetKeyState(VirtualKey.Control);
        return (ctrlState & CoreVirtualKeyStates.Down) == CoreVirtualKeyStates.Down;
    }

    protected async override void OnKeyUp(KeyRoutedEventArgs e)
    {
        base.OnKeyUp(e);
        if (IsCtrlKeyPressed())
        {
            if (e.Key == VirtualKey.E)
            {
                await EasterEggAsync();
            }
        }
    }

    /// <summary>
    /// Do something with an easter egg!
    /// </summary>
    /// <returns>The developer options async.</returns>
    private async Task EasterEggAsync()
    {
        // DO SOMETHING! 😀
        await DoAnEasterEggThing();
    }
}

Just like in our Android and iOS Shake examples, from here in UWP, we can get reference to our current Xamarin.Forms page and execute with some context by hitting (App.Current.MainPage as NavigationPage).CurrentPage assuming that the MainPage of our app is a NavigationPage.

In another post, we will look at combining these 3 platform methods to give ourselves as developers some tools to make our lives easier while debugging and testing!


If you like what you see, don’t forget to follow me on twitter @Suave_Pirate, check out my GitHub, and subscribe to my blog to learn more mobile developer tips and tricks!

Interested in sponsoring developer content? Message @Suave_Pirate on twitter for details.


.NET Flux Toolkit Nuget Announcement

Last week I mentioned that I was going to be publishing some of my GitHub library projects on Nuget to make them easier to integrate into your projects – Here’s the newest library for using the Flux in your .NET applications such as Xamarin, UWP, WPF, WinForms, and even ASP.NET.

Nuget: https://www.nuget.org/packages/FluxToolkit/
GitHub: https://github.com/SuavePirate/FluxToolkit/

Here’s how to get started!

FluxToolkit

A super simple library to enable the implementation of Flux in .NET Applications such as Xamarin, UWP, WPF, and more. It contains some base level Flux components to help you get started with your implementation faster.

What is Flux?

Flux is a design pattern created by Facebook with the purpose of creating robust data-driven UI components and handles the flow of data between components and outward to services.

Components

Flux consists of 4 major components – Stores, Actions, Components, and the Dispatcher

Stores

Stores are responsible for containing and managing data for a single domain or data type. Stores listen to the dispatcher for certain events and use the data from the dispatcher to update their data, handle errors, and then pass that update down to the components that are subscribed to the store.

Actions

Actions are responsible for piping events through the dispatcher. Actions are invoked from Components or from background processes. They can also handle some small business logic such as data mapping or talking to external services.

Components

Components are the UI and UI logic layers. They are responsible for displaying views to the users and for handling user events. They invoke Actions and subsribe to Stores to handle updates to the data.

Dispatcher

A single dispatcher is responsible for the Pub/Sub mechanism of events invoked from Actions. Stores subscribe to events by name through the Dispatcher.

How does it work with MVVM and data binding?

ViewModels can be considered part of the Component layer but are separated from the actual UI/Views. This means that the ViewModels are responsible for invoking Actions, and subscribing to Stores. The Views themselves are only responsible for showing the UI and communicating to the ViewModel.

Getting Started

Install

The FluxToolkit is available on Nuget: https://www.nuget.org/packages/FluxToolkit It has no external dependencies and should work with any .NET Standard library or project including Xamarin, Xamarin.Forms, UWP, WPF, and even WinForms. It has not been used for web application development, but it is compatible with ASP.NET projects.

Install the nuget package with the nuget package manager or via the Package Manager command line:

Install-Package FluxToolkit

Create your Stores

Use the StoreBase class from the FluxToolkit to implement your unique stores for your different data types. It contains a generic Data field based on the TData type you pass into the definition. Now you don’t have to worry about communicating to the dispatcher for pub/sub – simply call the base methods for Subsribe and Unsubscribe.

Ensure that you are not using multiple instances of your Stores, but rather should be using either a Singleton or Inversion of Control with Dependency Injection to pass the implementation of your Store to the Components that require it through the constructor. Constantly creating new Stores can cause memory leaks due to the event subscriptions.

Here’s an example store implementation:

    /// <summary>
    /// Event store for holding and managing todo items
    /// </summary>
    public class TodoStore : StoreBase<ObservableCollection<Todo>>
    {
        /// <summary>
        /// Creates a new store and handles subscriptions to the dispatcher
        /// </summary>
        public TodoStore()
        {
            Subscribe<string>(TodoActionTypes.ADD_TODO);
            Subscribe(TodoActionTypes.DELETE_COMPLETED_TODOS);
            Subscribe<string>(TodoActionTypes.DELETE_TODO);
            Subscribe<Todo>(TodoActionTypes.EDIT_TODO);
            Subscribe(TodoActionTypes.TOGGLE_ALL_TODOS);
            Subscribe<string>(TodoActionTypes.TOGGLE_TODO);

            Data = new ObservableCollection<Todo>();
        }

        /// <summary>
        /// Processes an event from the dispatcher before emitting it.
        /// </summary>
        /// <typeparam name="TData"></typeparam>
        /// <param name="eventType"></param>
        /// <param name="data"></param>
        protected override void ReceiveEvent<TData>(string eventType, TData data)
        {
            try
            {
                Error = null;
                switch (eventType)
                {
                    case TodoActionTypes.ADD_TODO:
                        Data.Add(new Todo
                        {
                            Id = Guid.NewGuid().ToString(),
                            Text = data as string,
                            IsComplete = false
                        });
                        break;
                    case TodoActionTypes.DELETE_COMPLETED_TODOS:
                        var itemsToRemove = Data.Where(t => t.IsComplete);
                        foreach(var item in itemsToRemove.ToList())
                        {
                            Data.Remove(item);
                        }
                        break;
                    case TodoActionTypes.DELETE_TODO:
                        var itemToRemove = Data.FirstOrDefault(t => t.Id == data as string);
                        if (itemToRemove != null)
                            Data.Remove(itemToRemove);
                        break;
                    case TodoActionTypes.EDIT_TODO:
                        var itemToEdit = Data.FirstOrDefault(t => t.Id == (data as Todo).Id);
                        if (itemToEdit != null)
                            itemToEdit.Text = (data as Todo).Text;
                        break;
                    case TodoActionTypes.TOGGLE_ALL_TODOS:
                        var areAllComplete = !Data.Any(t => !t.IsComplete);
                        foreach(var todo in Data)
                        {
                            todo.IsComplete = !areAllComplete;
                        }
                        break;
                    case TodoActionTypes.TOGGLE_TODO:
                        var itemToToggle = Data.First(t => t.Id == (data as string));
                        if (itemToToggle != null)
                            itemToToggle.IsComplete = !itemToToggle.IsComplete;
                        break;

                }
            }
            catch (Exception ex)
            {
                // if something goes wrong, set the error before emitting
                Error = ex.Message;
            }
           
            base.ReceiveEvent(eventType, data);
        }
    }

Create your Actions

Create an Actions class for each of your main data types. These actions will call to the Dispatcher to fire events and will also need to implement IActions in order to properly handle the pub/sub mechanism.

    /// <summary>
    /// Actions to be taken against Todo items
    /// </summary>
    public class TodoActions : IActions
    {
        public void AddTodo(string text)
        {
            Dispatcher.Send<IActions, string>(this, TodoActionTypes.ADD_TODO, text);
        }

        public void DeleteCompletedTodos()
        {
            Dispatcher.Send<IActions>(this, TodoActionTypes.DELETE_COMPLETED_TODOS);
        }

        public void DeleteTodo(string id)
        {
            Dispatcher.Send<IActions, string>(this, TodoActionTypes.DELETE_TODO, id);
        }

        public void EditTodo(string id, string text)
        {
            Dispatcher.Send<IActions, Todo>(this, TodoActionTypes.EDIT_TODO, new Todo
            {
                Id = id,
                Text = text
            });
        }

        public void StartEditingTodo(string id)
        {
            Dispatcher.Send<IActions, string>(this, TodoActionTypes.START_EDITING_TODO, id);
        }

        public void StopEditingTodo()
        {
            Dispatcher.Send<IActions>(this, TodoActionTypes.STOP_EDITING_TODO);
        }

        public void ToggleAllTodos()
        {
            Dispatcher.Send<IActions>(this, TodoActionTypes.TOGGLE_ALL_TODOS);
        }

        public void ToggleTodo(string id)
        {
            Dispatcher.Send<IActions, string>(this, TodoActionTypes.TOGGLE_TODO, id);
        }
        
    }

Define your ActionTypes

For each of your data types, you’ll need to define some ActionTypes which translate to the id or name of the events your Actions are invoking through the Dispatcher.

    /// <summary>
    /// Different types of actions that can be completed within the context of Todo items
    /// </summary>
    public class TodoActionTypes
    {
        public const string ADD_TODO = "add_todo";
        public const string DELETE_COMPLETED_TODOS = "delete_completed_todos";
        public const string DELETE_TODO = "delete_todo";
        public const string EDIT_TODO = "edit_todo";
        public const string START_EDITING_TODO = "start_editing_todo";
        public const string STOP_EDITING_TODO = "stop_editing_todo";
        public const string TOGGLE_ALL_TODOS = "toggle_all_todos";
        public const string TOGGLE_TODO = "toggle_todo";
        public const string UPDATE_DRAFT = "update_draft";
    }

Wire up your Components (with MVVM or without)

Have your components subscribe to the Stores that are appropriate for the data need, and invoke the Actions they need. This is a great place to place inject your Stores and Actions into the constructor of your Componentswhether it is through a ViewModel or an ActivityViewController, or Xamarin.Forms.Page.

    public class TodoListPageViewModel : BasePageViewModel
    {
        private readonly TodoStore _todoStore;
        private readonly TodoActions _todoActions;
        private ObservableCollection<Todo> _items;
        private ICommand _createCommand;
        private ICommand _toggleCommand;
        private ICommand _toggleAllCommand;
        private ICommand _deleteCommand;
        private ICommand _deleteCompletedCommand;
        private ICommand _editCommand;
        private ICommand _populateCommand;

        public ICommand CreateCommand
        {
            get
            {
                return _createCommand ??
                    (_createCommand = new RelayCommand(async () =>
                    {
                        var result = await UserDialogs.Instance.PromptAsync(string.Empty, "New", "Done", "Cancel", "Todo...");
                        if (result.Ok)
                        {
                            _todoActions.AddTodo(result.Text);
                        }
                    }));
            }
        }

        public ICommand EditCommand
        {
            get
            {
                return _editCommand ??
                    (_editCommand = new RelayCommand<Todo>(async (t) =>
                    {
                        var result = await UserDialogs.Instance.PromptAsync(new PromptConfig()
                            .SetText(t.Text)
                            .SetTitle("Edit")
                            .SetOkText("Done")
                            .SetCancelText("Cancel")
                            .SetPlaceholder("Todo..."));
                        if (result.Ok)
                        {
                            _todoActions.EditTodo(t.Id, result.Text);
                        }
                    }));
            }
        }

        public ICommand ToggleCommand
        {
            get
            {
                return _toggleCommand ??
                    (_toggleCommand = new RelayCommand<Todo>((t) =>
                    {
                        _todoActions.ToggleTodo(t.Id);
                    }));
            }
        }

        public ICommand ToggleAllCommand
        {
            get
            {
                return _toggleAllCommand ??
                    (_toggleAllCommand = new RelayCommand(() =>
                    {
                        _todoActions.ToggleAllTodos();
                    }));
            }
        }

        public ICommand DeleteCommand
        {
            get
            {
                return _deleteCommand ??
                    (_deleteCommand = new RelayCommand<Todo>((t) =>
                    {
                        _todoActions.DeleteTodo(t.Id);
                    }));
            }
        }

        public ICommand DeleteCompletedCommand
        {
            get
            {
                return _deleteCompletedCommand ??
                    (_deleteCompletedCommand = new RelayCommand(() =>
                    {
                        _todoActions.DeleteCompletedTodos();
                    }));
            }
        }

        public ICommand PopulateCommand
        {
            get
            {
                return _populateCommand ??
                    (_populateCommand = new RelayCommand(() =>
                    {
                        for(var i = 1; i < 20; i++)
                        {
                            _todoActions.AddTodo($"New Item {i}");
                            Task.Delay(200);
                        }
                    }));
            }
        }

        public ObservableCollection<Todo> Items
        {
            get
            {
                return _todoStore.Data;
            }
        }

        public TodoListPageViewModel(TodoStore todoStore, TodoActions todoActions)
        {
            _todoStore = todoStore;
            _todoActions = todoActions;
            _todoStore.OnEmitted += TodoStore_OnEmitted;
        }

        /// <summary>
        /// Processes events from the todo store and updates any UI that isn't handled automatically
        /// </summary>
        /// <param name="sender"></param>
        /// <param name="e"></param>
        private void TodoStore_OnEmitted(object sender, StoreEventArgs e)
        {
            switch (e.EventType)
            {
                case TodoActionTypes.ADD_TODO:
                    if(_todoStore.Error == null)
                    {
                        UserDialogs.Instance.Toast("Item added");
                    }
                    break;
                case TodoActionTypes.DELETE_COMPLETED_TODOS:
                    if (_todoStore.Error == null)
                    {
                        UserDialogs.Instance.Toast("Items deleted");
                    }
                    break;
                case TodoActionTypes.DELETE_TODO:
                    if (_todoStore.Error == null)
                    {
                        UserDialogs.Instance.Toast("Item deleted");
                    }
                    break;
                case TodoActionTypes.TOGGLE_ALL_TODOS:
                    if (_todoStore.Error == null)
                    {
                        UserDialogs.Instance.Toast("Items toggled");
                    }
                    break;
                case TodoActionTypes.TOGGLE_TODO:
                    if (_todoStore.Error == null)
                    {
                        UserDialogs.Instance.Toast("Item toggled");
                    }
                    break;
            }
            if(_todoStore.Error != null)
            {
                UserDialogs.Instance.ShowError(_todoStore.Error);
            }
        }
    }

Contributing

Want to add additional examples or more tooling to help people develop their apps with Flux? Fork this repository and create a pull request!

Additional Resources


If you like what you see, don’t forget to follow me on twitter @Suave_Pirate, check out my GitHub, and subscribe to my blog to learn more mobile developer tips and tricks!

Interested in sponsoring developer content? Message @Suave_Pirate on twitter for details.
Reality, Virtually, Hackathon This Weekend!

Reality, Virtually, Hackathon is this weekend October 6th – 9th at MIT’s Media Labs.

I’m excited to announce that I’ll be joining the Microsoft team to mentor participants at this year’s installment of the hackathon. If you’re working with Microsoft technologies such as using C# with Unity, Hololens, Acer VR, Xamarin with ARKit and ARCore, Xenko,  or using any of the Azure Cloud Services, then I’m here to help. I’m looking forward to working with some incredible teams with some of the latest technology to build some awe inspiring applications.

Check out some of the other mentors there as well!
http://www.realityvirtuallyhack.com/mentors/ 

Here’s the schedule:

Event Schedule


Friday


Saturday


Sunday


Monday


I’ll be there from Friday evening until Sunday evening, so keep an eye out for me if you’re around!

If you like what you see, don’t forget to follow me on twitter @Suave_Pirate, check out my GitHub, and subscribe to my blog to learn more mobile developer tips and tricks!

Interested in sponsoring developer content? Message @Suave_Pirate on twitter for details.

Xamarin.Nuget – Coming to a Nuget Package Near You

Your voices have been heard – I’m bringing all my helpful controls and libraries to nuget!

Over the next two weeks, I will be going through each one of my projects and getting them nuget-ready. I’ll then be putting them up on nuget and announcing their individual releases here on my blog.

Here’s what you can expect to see on nuget:

So stay tuned, and if you want to contribute to any of these tools, please fork those repositories!

If you like what you see, don’t forget to follow me on twitter @Suave_Pirate, check out my GitHub, and subscribe to my blog to learn more mobile developer tips and tricks!

Interested in sponsoring developer content? Message @Suave_Pirate on twitter for details.
HackMIT This Weekend!

HackMIT is this weekend, September 16-17.

I’m happy to announce that I’ll be mentoring as one of the local Microsoft MVPs that were invited to help as part of the Microsoft sponsorship of the event. I look forward to building some incredible applications with some of the brightest students coming to Cambridge, and may the best faction win! Keep an eye out for me Sunday morning, and feel free to reach out if you’re attending.


If you like what you see, don’t forget to follow me on twitter @Suave_Pirate, check out my GitHub, and subscribe to my blog to learn more mobile developer tips and tricks!

Interested in sponsoring developer content? Message @Suave_Pirate on twitter for details.


Xamarin.Tip – Borderless Inputs

I published multiple posts this week about creating Xamarin.Forms controls without borders using Custom renderers. This post is your one stop shop for all these posts. These are the controls that are used in my repository to create Material Design inputs in Xamarin.Forms that you can find here:
https://github.com/SuavePirate/SuaveControls.MaterialFormControls. These will be talked about in posts to come!
Check the borderless controls out here:

  1. Xamarin.Forms Borderless Entry
  2. Xamarin.Forms Borderless Picker
  3. Xamarin.Forms Borderless DatePicker
  4. Xamarin.Forms Borderless TimePicker
  5. Xamarin.Forms Borderless Editor

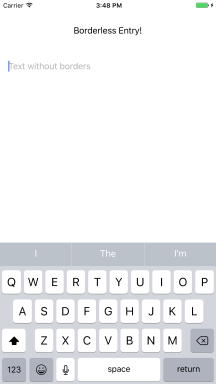
And check out how they look here:

BorderlessEntry


BorderlessEditor

BorderlessPicker

BorderlessDatePicker

BorderlessTimePicker

If you like what you see, don’t forget to follow me on twitter @Suave_Pirate, check out my GitHub, and subscribe to my blog to learn more mobile developer tips and tricks!

Interested in sponsoring developer content? Message @Suave_Pirate on twitter for details.

Xamarin.Tip – Borderless Editor

I previously put out a post on removing the border of a Xamarin.Forms Entry which was then used to create a custom PinView as well as a MaterialEntry that follows the material design standards for text fields. Check those out here:

In this post, we’ll apply some of the same principles to create a BorderlessEditor. It’s going to use a simple custom renderer, although this could and should be done using an Effect if being used on its own. However, this BorderlessEditor will be the foundation for future controls.

You can find this code as part of my library in progress to create Material Design Form controls for Xamarin.Forms – https://github.com/SuavePirate/SuaveControls.MaterialFormControls.

Let’s get started with our custom control by first creating a custom subclass of Xamarin.Forms.Editor followed by a custom renderer class for iOS, Android, and UWP that kills the border.

BorderlessEditor.cs

namespace SuaveControls.MaterialForms
{
    public class BorderlessEditor : Editor
    {
    }
}

Nothing special here since we are using the default behavior of the Editor.

Android

Now let’s create an Android custom renderer.

BorderlessEditorRenderer.cs – Android

[assembly: ExportRenderer(typeof(BorderlessEditor), typeof(BorderlessEditorRenderer))]
namespace SuaveControls.MaterialForms.Android.Renderers
{
    public class BorderlessEditorRenderer : EditorRenderer
    {
        public static void Init() { }
        protected override void OnElementChanged(ElementChangedEventArgs<Editor> e)
        {
            base.OnElementChanged(e);
            if (e.OldElement == null)
            {
                Control.Background = null;

                var layoutParams = new MarginLayoutParams(Control.LayoutParameters);
                layoutParams.SetMargins(0, 0, 0, 0);
                LayoutParameters = layoutParams;
                Control.LayoutParameters = layoutParams;
                Control.SetPadding(0, 0, 0, 0);
                SetPadding(0, 0, 0, 0);
            }
        }
    }
}

We simple kill the default padding and margins while setting the Background property to null. This Background is what creates the drawable underline for the AppCompat Editor.

iOS

Follow with an iOS renderer.

BorderlessEditorRenderer.cs – iOS

[assembly: ExportRenderer(typeof(BorderlessEditor), typeof(BorderlessEditorRenderer))]
namespace SuaveControls.MaterialForms.iOS.Renderers
{
    public class BorderlessEditorRenderer : EditorRenderer
    {
        public static void Init() { }
        protected override void OnElementPropertyChanged(object sender, PropertyChangedEventArgs e)
        {
            base.OnElementPropertyChanged(sender, e);

            Control.Layer.BorderWidth = 0;
        }
    }
}

All we do here is set the BorderWidth to 0.

UWP

Lastly a renderer for UWP

BorderlessEditorRenderer.cs – UWP


[assembly: ExportRenderer(typeof(BorderlessEditor), typeof(BorderlessEditorRenderer))]

namespace SuaveControls.MaterialForms.UWP.Renderers
{
    public class BorderlessEditorRenderer : EditorRenderer
    {
        public static void Init() { }
        protected override void OnElementChanged(ElementChangedEventArgs<Editor> e)
        {
            base.OnElementChanged(e);

            if (Control != null)
            {
                Control.BorderThickness = new Windows.UI.Xaml.Thickness(0);
                Control.Margin = new Windows.UI.Xaml.Thickness(0);
                Control.Padding = new Windows.UI.Xaml.Thickness(0);
            }
        }
    }
}

Similar to how we did it on Android, we set both the Margin and Padding to 0 and also set the BorderThickness to a 0’d Thickness.

Using the BorderlessEditor

Now you can use the BorderlessEditor in your XAML or C# code:

MainPage.xaml

<?xml version="1.0" encoding="utf-8" ?>
<ContentPage xmlns="http://xamarin.com/schemas/2014/forms"
             xmlns:x="http://schemas.microsoft.com/winfx/2009/xaml"
             xmlns:local="clr-namespace:ExampleMaterialApp"
             xmlns:suave="clr-namespace:SuaveControls.MaterialForms;assembly=SuaveControls.MaterialForms"
             x:Class="ExampleMaterialApp.MainPage">

    <ScrollView>
        <StackLayout Spacing="16" Margin="16" BackgroundColor="Blue">
            <Label Text="Borderless Editor!" Margin="32" HorizontalOptions="Center" HorizontalTextAlignment="Center"/>
            <suave:BorderlessEditor BackgroundColor="Black" TextColor="White" HeightRequest="300" Margin="32"/>

        </StackLayout>
    </ScrollView>

</ContentPage>

Check out those results on iOS:

If you like what you see, don’t forget to follow me on twitter @Suave_Pirate, check out my GitHub, and subscribe to my blog to learn more mobile developer tips and tricks!

Interested in sponsoring developer content? Message @Suave_Pirate on twitter for details.

Xamarin.Tip – Borderless TimePicker

I previously put out a post on removing the border of a Xamarin.Forms Entry which was then used to create a custom PinView as well as a MaterialEntry that follows the material design standards for text fields. I also added a post just like this one that talks about creating a BorderlessPicker. Check those out here:

In this post, we’ll do exactly what we did with the BorderlessPicker, but apply it to the Xamarin.Forms.TimePicker control to remove the border. This would ideally be done using an Effect, however we will be using this control in a later post to create a MaterialTimePicker to fit the Material Design standards for form inputs, so we will create custom renderers for Android, iOS, and UWP.

You can find this code as part of my library in progress to create Material Design Form controls for Xamarin.Forms – https://github.com/SuavePirate/SuaveControls.MaterialFormControls.

Let’s get started with our custom control by first creating a custom subclass of Xamarin.Forms.TimePicker followed by a custom renderer class for iOS, Android, and UWP that kills the border.

BorderlessTimePicker.cs

namespace SuaveControls.MaterialForms
{
    public class BorderlessTimePicker : TimePicker
    {
    }
}

Nothing special here since we are using the default behavior of the TimePicker.

Android

Now let’s create an Android custom renderer.

BorderlessTimePickerRenderer.cs – Android

[assembly: ExportRenderer(typeof(BorderlessTimePicker), typeof(BorderlessTimePickerRenderer))]
namespace SuaveControls.MaterialForms.Android.Renderers
{
    public class BorderlessTimePickerRenderer : TimePickerRenderer
    {
        public static void Init() { }
        protected override void OnElementChanged(ElementChangedEventArgs<TimePicker> e)
        {
            base.OnElementChanged(e);
            if (e.OldElement == null)
            {
                Control.Background = null;

                var layoutParams = new MarginLayoutParams(Control.LayoutParameters);
                layoutParams.SetMargins(0, 0, 0, 0);
                LayoutParameters = layoutParams;
                Control.LayoutParameters = layoutParams;
                Control.SetPadding(0, 0, 0, 0);
                SetPadding(0, 0, 0, 0);
            }
        }
    }
}

We simple kill the default padding and margins while setting the Background property to null. This Background is what creates the drawable underline for the AppCompat TimePicker.

iOS

Follow with an iOS renderer.

BorderlessTimePickerRenderer.cs – iOS

[assembly: ExportRenderer(typeof(BorderlessTimePicker), typeof(BorderlessTimePickerRenderer))]
namespace SuaveControls.MaterialForms.iOS.Renderers
{
    public class BorderlessTimePickerRenderer : TimePickerRenderer
    {
        public static void Init() { }
        protected override void OnElementPropertyChanged(object sender, PropertyChangedEventArgs e)
        {
            base.OnElementPropertyChanged(sender, e);

            Control.Layer.BorderWidth = 0;
            Control.BorderStyle = UITextBorderStyle.None;
        }
    }
}

All we do here is set the BorderWidth to 0 and the BorderStyle to UITextBorderStyle.None.

UWP

Lastly a renderer for UWP

BorderlessTimePickerRenderer.cs – UWP


[assembly: ExportRenderer(typeof(BorderlessTimePicker), typeof(BorderlessTimePickerRenderer))]

namespace SuaveControls.MaterialForms.UWP.Renderers
{
    public class BorderlessTimePickerRenderer : TimePickerRenderer
    {
        public static void Init() { }
        protected override void OnElementChanged(ElementChangedEventArgs<TimePicker> e)
        {
            base.OnElementChanged(e);

            if (Control != null)
            {
                Control.BorderThickness = new Windows.UI.Xaml.Thickness(0);
                Control.Margin = new Windows.UI.Xaml.Thickness(0);
                Control.Padding = new Windows.UI.Xaml.Thickness(0);
            }
        }
    }
}

Similar to how we did it on Android, we set both the Margin and Padding to 0 and also set the BorderThickness to a 0’d Thickness.

Using the BorderlessTimePicker

Now you can use the BorderlessTimePicker in your XAML or C# code:

MainPage.xaml

<?xml version="1.0" encoding="utf-8" ?>
<ContentPage xmlns="http://xamarin.com/schemas/2014/forms"
             xmlns:x="http://schemas.microsoft.com/winfx/2009/xaml"
             xmlns:local="clr-namespace:ExampleMaterialApp"
             xmlns:suave="clr-namespace:SuaveControls.MaterialForms;assembly=SuaveControls.MaterialForms"
             x:Class="ExampleMaterialApp.MainPage">

    <ScrollView>
        <StackLayout Spacing="16" Margin="16">
            <Label Text="Borderless TimePicker!" Margin="32" HorizontalOptions="Center" HorizontalTextAlignment="Center"/>
            <suave:BorderlessTimePicker/>

        </StackLayout>
    </ScrollView>

</ContentPage>

Check out those results on iOS:

If you like what you see, don’t forget to follow me on twitter @Suave_Pirate, check out my GitHub, and subscribe to my blog to learn more mobile developer tips and tricks!

Interested in sponsoring developer content? Message @Suave_Pirate on twitter for details.