Introducing Suave Streams

Welcome to Suave Streams at https://twitch.tv/suave_pirate where I’ll be taking some time twice a week to build some of the coolest, funniest, and also innovative pieces of software using real-world patterns, practices, and tools.

Come for a laugh, come to build, and come to learn! We’ll be jumping into languages, and tools like:

  • C#
  • TypeScript
  • Kotlin
  • Swift
  • ASP.NET Core
  • Alexa Skills
  • Actions on Google
  • Bixby Capsules
  • Conversational AI
  • Real time communications
  • Xamarin/Maui.NET
  • UWP
  • Game Development
  • Bot building

and so much more!

We’re starting off with a schedule of every:

  • Sunday 12:30-4:30PM EST
  • Wednesday 6-10PM EST

I hope you’ll join for our first ever livestream this Sunday, May 22nd at 12:30pm EST where we are starting to build an Alexa Skill to Beat Call of Duty Warzone! Using:

C#, ASP.NET Core APIs, SignalR, UWP, Alexa Skills SDK, and scalable architectures and design patterns to make it come to life.

After each stream, I’ll also be uploading the whole recording (with minor edits) to my YouTube over at https://www.youtube.com/channel/UC1ycVqsWOInQuel68295M7w

So if you can’t make the stream, you won’t miss out on all the fun. Be sure to follow me on twitch for updates on when I go live and to keep up with the projects we start creating!

See you there!


Alexa.Tip – Build Unit Tested Skills in .NET

In this Alexa.Tip series, we explore some little bits of code that can make your life easier in developing Alexa Skills in many languages including C# + .NET, node.jS + TypeScript, Kotlin, etc. We look at concepts, design patterns, and implementations that developers might not be aware of, and how they can be applied to voice application development, best practices, and more!

In this post, we explore some more best practices in developing Alexa Skills in C# whether you are using an ASP.NET Core API or an AWS Lambda. This post will expand our previous posts about building better abstractions for handling Alexa responses and demonstrate how we can now properly Unit test these handlers as well as any other separated bits of logic that the Handler implementations consume.

Check out all the raw source code for this post, and more here: https://github.com/SuavePirate/Alexa.Tips.Net

Prerequisite

If you haven’t read up on how to use the Handler Registration Pattern, take a look at my earlier post here: Alexa.Tip – Using Handler Registration Pattern in .NET

The short version is that we use this pattern of registering IHandler implementations to handle different types of requests that our skill receives, regardless of whether we are using AWS Lambdas or ASP.NET Core APIs.

Unit Testing Handlers

Since we now have nice atomized units (Handlers) built for each of our RequestTypes and Intents, they are SCREAMING to be unit tested. So, we can easily test them against different scenarios given our positive and negative cases.

Take for example, the SimpleLaunchHandler that is responsible only for LaunchRequest, and whose HandleAsync() implementation returns a static response. The two main cases we want to test against is the HandleAsync() returning properly for a proper LaunchRequest, and that the CanHandle() implementation returns false for non LaunchRequest skill requests.

In these samples, I’m using xUnit for my Unit tests, but the same concept is applicable with any other Unit testing framework (and really any other language).

In each case, we want to separate our 3 A’s of testing, “Arrange”, “Act”, and “Assert”. For these basic examples, the three steps are pretty clear.

  1. Arrange the Testable SkillRequest object
  2. Act on the subject’s method we are testing by sending it the SkillRequest
  3. Assert our final response

Let’s first test the CanHandle() against the postive case, meaning we want to send it data we want to be successful:

public class SimpleLaunchHandlerTests
{
    private readonly SimpleLaunchHandler _subject;
    public SimpleLaunchHandlerTests()
    {
        _subject = new SimpleLaunchHandler();
    }


    [Fact]
    public void SimpleHandler_CanHandleLaunchRequest()
    {
        // arrange
        var request = new SkillRequest()
        {
            Version = "1.0",
            Request = new LaunchRequest
            {
                Type = "LaunchRequest"
            }
        };

        // act
        var canHandle = _subject.CanHandle(request);

        // assert
        Assert.True(canHandle);
    }

}

Now let’s perform the opposite by sending it a request of a different type:

 [Fact]
public void SimpleHandler_CanNotHandleIntentRequest()
{
    // arrange
    var request = new SkillRequest()
    {
        Version = "1.0",
        Request = new IntentRequest
        {
            Type = "IntentRequest"
        }
    };

    // act
    var canHandle = _subject.CanHandle(request);

    // assert
    Assert.False(canHandle);
}

Now, we can look at the positive example of passing the LaunchRequest into the HandleAsync method:

[Fact]
public async Task SimpleHandler_ReturnsResponse()
{
    // arrange
    var request = new SkillRequest()
    {
        Version = "1.0",
        Request = new LaunchRequest
        {
            Type = "LaunchRequest"
        }
    };

    // act
    var response = await _subject.HandleAsync(request);

    // assert
    Assert.NotNull((response.Response.OutputSpeech as PlainTextOutputSpeech)?.Text);
}

Now that we have our LaunchRequest tested, let’s take a look at a simple static IntentRequest set of tests:

DogFactHandlerTests.cs

public class DogFactHandlerTests : IClassFixture<DogFactHandler>
{
    private readonly DogFactHandler _subject = new DogFactHandler();


    [Fact]
    public async Task DogFactHandler_ReturnsResponse()
    {
        // arrange
        var request = new SkillRequest()
        {
            Version = "1.0",
            Request = new IntentRequest
            {
                Type = "IntentRequest",
                Intent = new Intent
                {
                    Name = "DogFactIntent"
                }
            }
        };

        // act
        var response = await _subject.HandleAsync(request);

        // assert
        Assert.NotNull((response.Response.OutputSpeech as PlainTextOutputSpeech)?.Text);
    }

    [Fact]
    public void DogFactHandler_CanHandleIntentRequest()
    {
        // arrange
        var request = new SkillRequest()
        {
            Version = "1.0",
            Request = new IntentRequest
            {
                Type = "IntentRequest",
                Intent = new Intent
                {
                    Name = "DogFactIntent"
                }
            }
        };
        // act
        var canHandle = _subject.CanHandle(request);

        // assert
        Assert.True(canHandle);
    }
    [Fact]
    public void DogFactHandler_CanNotHandleLaunchRequest()
    {
        // arrange
        var request = new SkillRequest()
        {
            Version = "1.0",
            Request = new LaunchRequest
            {
                Type = "LaunchRequest"
            }
        };


        // act
        var canHandle = _subject.CanHandle(request);

        // assert
        Assert.False(canHandle);
    }
    [Fact]
    public void DogFactHandler_CanNotHandleOtherIntents()
    {
        // arrange
        var request = new SkillRequest()
        {
            Version = "1.0",
            Request = new IntentRequest
            {
                Type = "IntentRequest",
                Intent = new Intent
                {
                    Name = "AMAZON.HelpIntent"
                }
            }
        };


        // act
        var canHandle = _subject.CanHandle(request);

        // assert
        Assert.False(canHandle);
    }
}

Okay, cool, but what about stuff that isn’t static? What if I’m getting my data from somewhere else and want to test those cases? Let’s bring Moq into the picture!

Let’s take this handler for example:

SampleFactHandler.cs

public class SampleFactHandler : GenericHandler, IHandler
{
    private readonly SampleMessageDbContext _context;
    public SampleFactHandler(SampleMessageDbContext context)
    {
        _context = context;
    }
    public override string IntentName => "SampleMessageIntent";

    public override Type RequestType => typeof(IntentRequest);

    public override async Task<SkillResponse> HandleAsync(SkillRequest request)
    {
        // just grab one as an example
        var message = await _context.SampleMessages.FirstOrDefaultAsync();
        return ResponseBuilder.Tell(message?.Content ?? "I don't have any messages for you.");
    }
}

So this Handler uses an Entity Framework Core DbContext with a table of SampleMessage objects to get the content. In this sample, we just grab the first one, but you could imagine some more complex data-logic to pull out the proper message.

To unit test this, we can pass in different “Mock” implementations of the SampleMessageDbContext. For this, I usually use Moq, but you can also pass in a full implementation that you’ve built yourself.

Here are some samples of testing this with different Moq’d contexts to test a few scenarios. Note: we still want to test against the CanHandle and HandleAsync as well, but now we have two different cases to test for such as if there are no messages in the db, and when there is one.

SampleFactHandlerTests.cs

public class SampleFactHandlerTests
{
    [Fact]
    public async Task SampleFactHandler_ReturnResponseWithData()
    {
        // arrange
        var context = new Mock<SampleMessageDbContext>();
        context.Setup(d => d.SampleMessages.FirstOrDefaultAsync(CancellationToken.None)).Returns(Task.FromResult(new SampleMessage
        {
            Id = Guid.NewGuid().ToString(),
            Content = "This is a mocked response message"
        }));
        var subject = new SampleFactHandler(context.Object);
        var request = new SkillRequest()
        {
            Version = "1.0",
            Request = new IntentRequest
            {
                Type = "IntentRequest",
                Intent = new Intent
                {
                    Name = "SampleMessageIntent"
                }
            }
        };

        // act
        var response = await subject.HandleAsync(request);

        // assert
        Assert.NotNull((response.Response.OutputSpeech as PlainTextOutputSpeech)?.Text);
    }
    [Fact]
    public async Task SampleFactHandler_ReturnFallbackResponseWithNoData()
    {
        // arrange
        var context = new Mock<SampleMessageDbContext>();
        context.Setup(d => d.SampleMessages.FirstOrDefaultAsync(CancellationToken.None)).Returns(Task.FromResult<SampleMessage>(null));
        var subject = new SampleFactHandler(context.Object);
        var request = new SkillRequest()
        {
            Version = "1.0",
            Request = new IntentRequest
            {
                Type = "IntentRequest",
                Intent = new Intent
                {
                    Name = "SampleMessageIntent"
                }
            }
        };

        // act
        var response = await subject.HandleAsync(request);

        // assert
        Assert.True((response.Response.OutputSpeech as PlainTextOutputSpeech)?.Text == "I don't have any messages for you.");
    }
}

We can also, and probably should also add some CanHandle and non-assinable Intent types to test, but for the sake of not making you read the same thing over and over again, these are the two that matters.

Unit Testing Controllers

Personally, I don’t typically unit test my Controllers, but that’s because I have some general rules in place to not change them one they are implemented. However, when working on a team, it may be easier and more sustainable to implement a few test on the controller to guarantee that changes made to it don’t affect the currently working implementation.

Some basic positive/negative test might look like this:

SimpleAlexaControllerTests.cs

public class SimpleAlexaControllerTests
{
    [Fact]
    public async Task AlexaController_ResponseWithHandler() 
    {
        // arrange
        var subject = new SimpleAlexaController(new List<IHandler>{ new DogFactHandler() });
        var request = new SkillRequest()
        {
            Version = "1.0",
            Request = new IntentRequest
            {
                Type = "IntentRequest",
                Intent = new Intent
                {
                    Name = "DogFactIntent"
                }
            }
        };
        // act
        var response = _subject.HandleRequest(request);

        // assert
        Assert.NotNull((response.Response.OutputSpeech as PlainTextOutputSpeech)?.Text);
    }

    [Fact]
    public async Task AlexaController_ResponseWithoutHandler() 
    {
        // arrange
        var subject = new SimpleAlexaController(new List<IHandler>{ new SimpleLaunchHandler() }); // no DogFactHandler
        var request = new SkillRequest()
        {
            Version = "1.0",
            Request = new IntentRequest
            {
                Type = "IntentRequest",
                Intent = new Intent
                {
                    Name = "DogFactIntent"
                }
            }
        };

        // act
        var response = _subject.HandleRequest(request);

        // assert
        Assert.Null(response);
    }
}

Unit Testing Lambda Functions

Just like testing the Controller, if you are using AWS Lambda rather than ASP.NET Core, you can create unit tests against your Function endpoint in order to get some coverage. That could look simple like something here:

FunctionHandlerTests.cs

public class FunctionHandlerTests
{

    [Fact]
    public async Task LambdaFunction_ResponseWithHandler() 
    {
        // arrange
        var subject = new SimpleAlexaHandler();
        subject.Handlers = new List<IHandler>{ new DogFactIntent() });
        var request = new SkillRequest()
        {
            Version = "1.0",
            Request = new IntentRequest
            {
                Type = "IntentRequest",
                Intent = new Intent
                {
                    Name = "DogFactIntent"
                }
            }
        };
        // act
        var response = _subject.HandleRequest(request, null);

        // assert
        Assert.NotNull((response.Response.OutputSpeech as PlainTextOutputSpeech)?.Text);
    }

    [Fact]
    public async Task LambdaFunction_ResponseWithoutHandler() 
    {
        // arrange
        var subject = new SimpleAlexaHandler();
        subject.Handlers = new List<IHandler>{ new SimpleLaunchHandler() }); // no DogFactIntent handler
        var request = new SkillRequest()
        {
            Version = "1.0",
            Request = new IntentRequest
            {
                Type = "IntentRequest",
                Intent = new Intent
                {
                    Name = "DogFactIntent"
                }
            }
        };

        // act
        var response = _subject.HandleRequest(request);

        // assert
        Assert.Null(response);
    }

}

That’s all the unit test types for now! Anything else that needs testing would be tested outside the Alexa specific logic. But hey! Now we can write some strong and code-covered tested skills which leads to better skills overall

What’s next?

Check out more Alexa Developer Tips here: https://alexdunn.org/tag/alexa/


If you like what you see, don’t forget to follow me on twitter @Suave_Pirate, check out my GitHub, and subscribe to my blog to learn more mobile and AI developer tips and tricks!

Interested in sponsoring developer content? Message @Suave_Pirate on twitter for details.


voicify_logo
I’m the Director and Principal Architect over at Voicify. Learn how you can use the Voice Experience Platform to bring your brand into the world of voice on Alexa, Google Assistant, Cortana, chat bots, and more: https://voicify.com/


Alexa.Tip – Using Dependency Injection with Handlers in .NET

In this Alexa.Tip series, we explore some little bits of code that can make your life easier in developing Alexa Skills in many languages including C# + .NET, node.jS + TypeScript, Kotlin, etc. We look at concepts, design patterns, and implementations that developers might not be aware of, and how they can be applied to voice application development, best practices, and more!

In this post, we explore some more best practices in developing Alexa Skills in C# whether you are using an ASP.NET Core API or an AWS Lambda. This time, we talk about taking our Handler Registration Pattern to the next level by using dependencies in them such as EF DbContexts or really any other service you want to inject.

Check out all the raw source code for this post, and more here: https://github.com/SuavePirate/Alexa.Tips.Net

If you haven’t read up on how to use the Handler Registration Pattern, take a look at my earlier post here: Alexa.Tip – Using Handler Registration Pattern in .NET

The short version is that we use this pattern of registering IHandler implementations to handle different types of requests that our skill receives, regardless of whether we are using AWS Lambdas or ASP.NET Core APIs.

Building Handlers with Dependencies

So we’ve seen samples of simple Handlers that use static responses simply using the ResponseBuilder from the Alexa.NET Library, but now let’s take it to the next logical step and start to get some data from a database. In this case, I am using Entity Framework, and therefore need to access my DbContext to get data.

To do this, we should inject the DbContext, in this case a SampleMessageDbContext into the constructor of the SampleFactHandler, then use it locally in the HandleAsync() method to get a single message.

SampleFactHandler.cs

public class SampleFactHandler : GenericHandler, IHandler
{
    private readonly SampleMessageDbContext _context;
    public SampleFactHandler(SampleMessageDbContext context)
    {
        _context = context;
    }
    public override string IntentName => "SampleMessageIntent";

    public override Type RequestType => typeof(IntentRequest);

    public override async Task<SkillResponse> HandleAsync(SkillRequest request)
    {
        // just grab one as an example
        var message = await _context.SampleMessages.FirstOrDefaultAsync();
        return ResponseBuilder.Tell(message?.Content ?? "I don't have any messages for you.");
    }
}

Although this simple example just grabs the first row from the db for the SampleMessages table, you could imagine some more complex data logic applied here to find the proper response we want for the given request. I also added some quick null handling just to clean it up for a real sample.

Registering Handlers with Dependencies

Now that we have our SampleFactHandler, we need to register it to our ICollection, but also construct it using the SampleMessageDbContext. There are a couple ways to do this. For simple situations, you just need to register the DbContext in your Startup, then grab it from the ServiceCollection when creating the List:

Startup.cs

public class Startup
{
    public Startup(IConfiguration configuration)
    {
        Configuration = configuration;
    }

    public IConfiguration Configuration { get; }

    // This method gets called by the runtime. Use this method to add services to the container.
    public void ConfigureServices(IServiceCollection services)
    {
        // add other dependencies first
        services.AddDbContext<SampleMessageDbContext>(options =>
        {
            options.UseInMemoryDatabase("InMemoryDbForTesting");
        });

        // Register your handlers here!
        services.AddScoped<ICollection<IHandler>>(s =>
        {
            // get the db context to inject in the handlers that are dependent
            var dbContext = s.GetRequiredService<SampleMessageDbContext>();
            return new List<IHandler>
            {
                new SimpleLaunchHandler(),
                new DogFactHandler(),
                new SampleFactHandler(dbContext)
            };
        });

        services.AddMvc().SetCompatibilityVersion(CompatibilityVersion.Version_2_1);
    }

    // This method gets called by the runtime. Use this method to configure the HTTP request pipeline.
    public void Configure(IApplicationBuilder app, IHostingEnvironment env)
    {
        if (env.IsDevelopment())
        {
            app.UseDeveloperExceptionPage();
        }
        else
        {
            app.UseHsts();
        }

        app.UseHttpsRedirection();
        app.UseMvc();
    }
}

Alternatively, you could create a class whose responsibility is to hold onto the handlers and construct that list with all the IHandlers. Something like this:

IHandlerContainer.cs

public interface IHandlerContainer
{
    ICollection<IHandler> Handlers { get; }
}

HandlerContainer.cs

public class HandlerContainer : IHandlerContainer 
{
    public ICollection<IHandler> Handlers { get; private set; }
    public HandlerContainer(SimpleLaunchHandler launch, DogFactHandler dogFact, SampleFactHandler sampleFact)
    {
        Handlers = new List<IHandler> { launch, dogFact, sampleFact }
    }
}

With this container, we update our Startup to look something like this:

 public void ConfigureServices(IServiceCollection services)
    {
        // add other dependencies first
        services.AddDbContext<SampleMessageDbContext>(options =>
        {
            options.UseInMemoryDatabase("InMemoryDbForTesting");
        });
        services.AddScoped<SimpleLaunchHandler>();
        services.AddScoped<DogFactHandler>();
        services.AddScoped<SampleFactHandler>();
        services.AddScoped<IHandlerContainer, HandlerContainer>();

        services.AddMvc().SetCompatibilityVersion(CompatibilityVersion.Version_2_1);
    }

Then our Controller would consume the IHandlerContainer rather than a flat ICollection to look like this:

SimpleAlexaController.cs

[Route("[controller]")]
public class SimpleAlexaController : Controller
{
    private readonly IHandlerContainer _handlerContainer;
    public SimpleAlexaController(IHandlerContainer handlerContainer)
    {
        _handlerContainer = handlerContainer;
    }
    [HttpPost]
    public async Task<SkillResponse> HandleRequest([FromBody]SkillRequest request)
    {
        var viableHandler = _handlerContainer.Handlers.FirstOrDefault(h => h.CanHandle(request));
        return await viableHandler.HandleAsync(request);
    }
}

I think this little pattern helps cleanup the Startup without needing to explicitly pull dependencies out of the ServiceCollection in order to build the IHandlers. Which do you prefer?

What’s next?

In future posts, we’ll take a look at building on these types of handlers with things like:

  • Well written Unit Tests
  • Full Integration Tests
  • Advanced Contextual driven handlers

If there’s enough interest in this pattern and the tools I’m building around it, let me know in GitHub or Twitter and I’ll work on getting them into properly libraries and NuGet packages 🙂

Check out more Alexa Developer Tips here: https://alexdunn.org/tag/alexa/


If you like what you see, don’t forget to follow me on twitter @Suave_Pirate, check out my GitHub, and subscribe to my blog to learn more mobile and AI developer tips and tricks!

Interested in sponsoring developer content? Message @Suave_Pirate on twitter for details.


voicify_logo
I’m the Director and Principal Architect over at Voicify. Learn how you can use the Voice Experience Platform to bring your brand into the world of voice on Alexa, Google Assistant, Cortana, chat bots, and more: https://voicify.com/


Alexa.Tip – Using Handler Registration Pattern in .NET

In this Alexa.Tip series, we explore some little bits of code that can make your life easier in developing Alexa Skills in many languages including C# + .NET, node.jS + TypeScript, Kotlin, etc. We look at concepts, design patterns, and implementations that developers might not be aware of, and how they can be applied to voice application development, best practices, and more!

In this post, we explore some more best practices in developing Alexa Skills in C# whether you are using an ASP.NET Core API or an AWS Lambda. This time, we talk about using the Registration Pattern for our Request Handlers. This post builds off of some of the concepts found in a previous post: Alexa.Tip – Build Intent Handlers in .NET but uses a newer abstraction tactic I like that can be found in my Alexa .NET Samples Repo here: https://github.com/SuavePirate/Alexa.Tips.Net

If you followed the previous post, you saw the benefits of abstracting our Alexa specific business logic into Handlers. That post talked specifically about IntentHandlers, but I’ve gone about implementing a new pattern for handling all request types that follows some of the same patterns of the official Alexa Skills Kit SDKs in JavaScript and Java but with all the C# goodness of Dependency Injection, Abstractions, async, and more.

Build Handlers

The primary concept is to create Handlers that register with information about what types of requests they can handle, then register those handlers for Dependency Injection (but in a slightly different way than normal), then finding the proper Handler for the given request and passing the rest of the transaction off to it to run its logic.

Here’s a look at our foundation: the IHandler:

IHandler.cs

public interface IHandler
{
    Type RequestType { get; }
    string IntentName { get; }
    bool CanHandle(SkillRequest request);
    Task<SkillResponse> HandleAsync(SkillRequest request);
}

So with this, we can use RequestType to validate what type of request the handler is for such as LaunchRequest or IntentRequest. You can take a peep at all the request types of Alexa Skills here: https://developer.amazon.com/docs/custom-skills/request-types-reference.html

We can also use the IntentName to easily assign a specific intent to a handler if the RequestType is IntentRequest. Then CanHandle() is used for applying custom validation logic to tell the registration what type of requests it is for. An implementation of this might validate the RequestType and IntentName while still allowing a specific Handler to apply its own logic to whether it can handle the request or not such as checking sessionAttributes or Context.

To handle this abstraction, I implemented an abstract class to implement the default CanHandle:

GenericHandler.cs

public abstract class GenericHandler : IHandler
{
    public abstract string IntentName { get; }
    public abstract Type RequestType { get; }
    public abstract Task<SkillResponse> HandleAsync(SkillRequest request);
    public virtual bool CanHandle(SkillRequest request)
    {
        if (request.GetRequestType() != RequestType)
            return false;
        if(request.GetRequestType() == typeof(IntentRequest))
        {
            if ((request?.Request as IntentRequest)?.Intent?.Name != IntentName)
                return false;
        }
        return true;
    }
}

If you are using C# 8 (I’m not in this case because its in preview at time of writing this), you can just use the Default Interface Implementation feature instead of using this extra abstract class at all. So your IHandler would look like this:

IHandler.cs

public interface IHandler
{
    Type RequestType { get; }
    string IntentName { get; }
    Task<SkillResponse> HandleAsync(SkillRequest request);
    bool CanHandle(SkillRequest request)
    {
        if (request.GetRequestType() != RequestType)
            return false;
        if(request.GetRequestType() == typeof(IntentRequest))
        {
            if ((request?.Request as IntentRequest)?.Intent?.Name != IntentName)
                return false;
        }
        return true;
    }
}

The last bit is the actual HandleAsync() which is just used to actually process the request and build a response to send back to Alexa.

So let’s look at a real implementation with the most simple example I can think of.

SimpleLaunchHandler.cs

public class SimpleLaunchHandler : GenericHandler, IHandler
{
    public override string IntentName => null;

    public override Type RequestType => typeof(LaunchRequest);

    public override Task<SkillResponse> HandleAsync(SkillRequest request)
    {
        return Task.FromResult(ResponseBuilder.Ask("Welcome to abstracted .NET Alexa Skills. How can I help?", null));
    }
}

Request type of LaunchRequest because we are handling the welcome message of the skill. We don’t override the CanHandle because we only care about the RequestType, and then the HandleAsync just returns a result task with a simple text-only response welcoming the user.

Here’s an example of a basic Intent Handler for a specific intent:

DogFactHandler.cs

public class DogFactHandler : GenericHandler, IHandler
{
    public override string IntentName => "DogFactIntent";

    public override Type RequestType => typeof(IntentRequest);

    public override Task<SkillResponse> HandleAsync(SkillRequest request)
    {
        return Task.FromResult(ResponseBuilder.Tell("Dogs do in fact have a sense of time, and even miss you when you're gone."));
    }
}

Just like the SimpleLaunchHandler, we set the RequestType but instead to IntentRequest, then supply the name of the Intent we want to handle.

Find and Execute Handlers

Now that we have some implementations of IHandlers, we can register them to use in our actual skill. The general idea is to create the collection of these handlers, then find the correct one to use given the type of request and execute it.

In it’s simplest form, we have a collection of handlers:

var handlers = new List<IHandler> { new SimpleLaunchHandler(), new DogFactHandler() };

Then find the right one to use:

var foundHandler = handlers.FirstOrDefault(h => h.CanHandle());

Then execute it:

var response = await foundHandler.HandleAsync(request);

Implement in ASP.NET Core

Let’s take a look at a real sample of how to do this using ASP.NET Core as if we were using HTTPS as our fulfillment URL of our skill rather than an AWS Lambda ARN.

First thing we should do is register our IHandlers for dependency injection in our Startup:

Startup.cs

public class Startup
{
    public Startup(IConfiguration configuration)
    {
        Configuration = configuration;
    }

    public IConfiguration Configuration { get; }

    // This method gets called by the runtime. Use this method to add services to the container.
    public void ConfigureServices(IServiceCollection services)
    {
        // Register your handlers here!
        services.AddScoped<ICollection<IHandler>>(s =>
        {
            return new List<IHandler>
            {
                new SimpleLaunchHandler(),
                new DogFactHandler()
            };
        });

        services.AddMvc().SetCompatibilityVersion(CompatibilityVersion.Version_2_1);
    }

    // This method gets called by the runtime. Use this method to configure the HTTP request pipeline.
    public void Configure(IApplicationBuilder app, IHostingEnvironment env)
    {
        if (env.IsDevelopment())
            app.UseDeveloperExceptionPage();
        else
            app.UseHsts();

        app.UseHttpsRedirection();
        app.UseMvc();
    }
}

Now we can create a Controller that consumes an ICollection in the constructor. Alternatively, you can also register the IHandlers independently and then build the collection in the constructor of the Controller instead, but I kinda like this way better.

SimpleAlexaController.cs

[Route("[controller]")]
public class SimpleAlexaController : Controller
{
    private readonly ICollection<IHandler> _handlers;
    public SimpleAlexaController(ICollection<IHandler> handlers)
    {
        _handlers = handlers;
    }
    [HttpPost]
    public async Task<SkillResponse> HandleRequest([FromBody]SkillRequest request)
    {
        var viableHandler = _handlers.FirstOrDefault(h => h.CanHandle(request));
        return await viableHandler.HandleAsync(request);
    }
}

And that’s it! Now we can send requests to our /SimpleAlexa/ endpoint and use the handlers we registered. As we add more functionality to our Skill, we just create new IHandlers and add them to the Startup registration.

Implement in Lambda

So you might already know that Lambda functions don’t really play well with dependency injection outside of building a simple service locator, and their recommended practice is to build your code all in the lambda (yucky for us C# devs) or build your depdendent classes all at the beginning of executing the function. For this scenario, I like to have a single method for building my primary dependency (in this case, it’s the list of handlers again!). So our full Lambda Function code might looke like this:

Function.cs

public class Function 
{
    public async Task FunctionHandler(SkillRequest request, ILambdaContext context)
    {
        var viableHandler = BuildHandlers().FirstOrDefault(h => h.CanHandle(request));
        return await viableHandler.HandleAsync(request);
    }

    private ICollection<IHandler> BuildHandlers()
    {
        return new List<IHandler> { new SimpleLaunchHandler(), new DogFactHandler() };
    }
}

What’s next?

This is a pretty neat design pattern I’ve been working out in some custom Alexa Skills to help scale the codebase of more complex scenarios. These samples are quite simple, but hopefully convey how easy it is to get setup with this pattern, and start to get you thinking about ways to build ontop of this pattern.

In future posts, we’ll take a look at building on these types of handlers with things like:

  • Well written Unit Tests
  • Full Integration Tests
  • Using Entity Framework
  • Using multi-level dependency injection
  • Advanced Contextual driven handlers

If there’s enough interest in this pattern and the tools I’m building around it, let me know in GitHub or Twitter and I’ll work on getting them into properly libraries and NuGet packages 🙂

Check out more Alexa Developer Tips here: https://alexdunn.org/tag/alexa/


If you like what you see, don’t forget to follow me on twitter @Suave_Pirate, check out my GitHub, and subscribe to my blog to learn more mobile and AI developer tips and tricks!

Interested in sponsoring developer content? Message @Suave_Pirate on twitter for details.


voicify_logo
I’m the Director and Principal Architect over at Voicify. Learn how you can use the Voice Experience Platform to bring your brand into the world of voice on Alexa, Google Assistant, Cortana, chat bots, and more: https://voicify.com/


New Exam! AWS Certified Alexa Skill Builder – Specialty Exam

Earlier this summer, myself along with other Alexa Skill Subject Matter Experts (including Voicify CTO, Nick Laidlaw) joined Amazon to help create the new Certification Exam for Alexa Skill Builders.

We put in a lot of work over some intense workshops to develop and iterate on exam-worth questions and continue to work with the team at Amazon to determine the standard of grading the exam.

But the exam is now in a public beta! Take it now and let me know what you think.

AWS Certified Alexa Skill Builder – Specialty Beta Exam: https://aws.amazon.com/certification/beta-exam/

Taking the exam in beta form allows for strengthening the exam and the certification as well as future AWS specialty exams.

Other Exams from Alex

If you just LOVE exams and can’t get enough of the ones I help work on – be sure to take my Pluralsight Skill IQ Assessments. Read about them here: New Pluralsight Android Skill IQ Tests

Coming Soon to Blog Posts Near You

Side note for my more avid blog followers – apologies for the slow rollouts – I’ve been doing quite a bit of travelling and extra work the first quarter of 2019 but I have some great drafts in the works that will come around including work around:

  • ASP.NET Core
  • Xamarin
  • Kotlin
  • AWS Resources
  • Alexa
  • Google Assistant
  • Cortana
  • Bixby?
  • More 🙂

So stay tuned and thanks for your patience! I’m working on making more supportable and robust posts and OSS projects around them so there is a bit of upfront work as well but it will be worth it! 😀


If you like what you see, don’t forget to follow me on twitter @Suave_Pirate, check out my GitHub, and subscribe to my blog to learn more mobile developer tips and tricks!

Interested in sponsoring developer content? Message @Suave_Pirate on twitter for details.

Alexa.Tip – Build Intent Handlers in .NET

In this Alexa.Tip series, we explore some little bits of code that can make your life easier in developing Alexa Skills in many languages including C# + .NET, node.jS + TypeScript, Kotlin, etc. We look at concepts that developers might not be aware of, design patterns that and how they can be applied to voice application development, best practices, and more!

In this post, we explore some more best practices in developing Alexa Skills in C# whether you are using an ASP.NET Core API or an AWS Lambda. This time, we talk about abstracting our business logic out of either our Function or Controller and into separate Handler classes.

If you’ve done skill development in node.js or in .NET, you’ve probably noticed that a lot of docs, example apps, and real world apps are written with one BIG class or file. That’s pretty gross.

You may some C# examples look like this:

UglyFunction.cs

public class Function
{
    public async Task<SkillResponse> HandleRequest(SkillRequest input)
    {
        if(input.GetRequestType() == typeof(LaunchRequest))
        {
            return ResponseBuilder.Ask("Welcome to my skill written in one big function class with all my business logic in one place and no real testability! Ask me anything!", null);
        }

        if(input.GetRequestType() == typeof(IntentRequest))
        {
            var intentRequest = input.Request as IntentRequest;

            switch(intentRequest.Intent.Name)
            {
                case "MyIntent1":
                    // get slot values
                    // search database
                    // validate data
                    // build response 
                    // add card if it supports a screen
                    // return
                    break;
                case "Intent2":
                    // get slot values
                    // search third party api
                    // validate data
                    // build response 
                    // add card if it supports a screen
                    // return
                    break;
                case "Intent3":
                    // get slot values
                    // search database
                    // validate data
                    // build response 
                    // add card if it supports a screen
                    // return
                    break;
                case "Intent4":
                    // get slot values
                    // search third party api
                    // validate data
                    // build response 
                    // add card if it supports a screen
                    // return
                    break;
                case "Intent5":
                    // get slot values
                    // search database
                    // validate data
                    // build response 
                    // add card if it supports a screen
                    // return
                    break;

                // I think you get my point here...
            }
        }

        return ResponseBuilder.Tell("Something went wrong. Please try again later");
    }
}

So that’s pretty gross right? It’s untestable, difficult to update, and hard to read! But hey, we’re C# developers. So let’s build Alexa Skills like C# developers.

The proposal here is to abstract your intent logic into Handler classes. Then you can inject those either into your Function or your Controller if you’re using a RESTful API.

Here’s something that I hope can get you started:
– A generic IIntentHandler
– An inherited specific IIntentWhateverHandler
– An implementation of the IIntentWhateverHandler
– A testable and injectable version to be used in the function.

Let’s start.

IIntentHandler.cs

public interface IIntentHandler
{
    Task<SkillResponse> HandleIntent(IntentRequest input);
}

Now let’s get specific. In this simple case, this interface is empty but exists for registration – although you can add specific methods here as needed.

IMyIntentHandler.cs

public interface IMyIntentHandler : IIntentHandler
{
}

Now let’s create an example implementation of an intent handler that houses the business logic of the request.

MyIntentHandler.cs

public class MyIntentHandler : IMyIntentHandler
{
    private readonly MyDbContext _context;
    public MyIntentHandler(MyDbContext context)
    {
        // oh snap, we can inject db context
        _context = context;
    }

    public async Task<SkillResponse> HandleIntent(IntentRequest input)
    {
        var mySlot = input.Slots["MySlot"].Value; // assumes the slot is there from it being required in the interaction model
        var myMessage = await _context.Messages.FirstOrDefaultAsync(m => m.SomeValue == mySlot)

        if(myMessage == null)
        {
            return ResponseBuilder.Ask("I don't know that one. Try something else.");
        }

        return ResponseBuilder.Tell(myMessage.Content);
    }
}

Now let’s go about adding these handlers to our Function (the same thing can apply to our Controllers.

PrettyFunction.cs

public class Function
{
    private readonly IMyIntentHandler _myIntentHandler;

    private void Setup()
    {
        _myIntentHandler = new MyIntentHandler(...);
        // create the others - optionally implement a ServiceCollection
        // to handle proper dependency injection
    }
    public async Task<SkillResponse> HandleRequest(SkillRequest input)
    {
        if(input.GetRequestType() == typeof(LaunchRequest))
        {
            return ResponseBuilder.Ask("Welcome to my skill written in one big function class with all my business logic in one place and no real testability! Ask me anything!", null);
        }

        if(input.GetRequestType() == typeof(IntentRequest))
        {
            var intentRequest = input.Request as IntentRequest;

            switch(intentRequest.Intent.Name)
            {
                case "MyIntent1":
                    return await _myIntentHandler.HandleIntent(intentRequest);
                    break;
            }
        }

        return ResponseBuilder.Tell("Something went wrong. Please try again later");
    }
}

So now you can separately test your Handler classes, your Data classes, and your Function as a whole.

SO much better 🙂

Conclusion

We don’t have to follow how Amazon writes their node.js skills when we write them in C# – let’s use some proper OO design and testability to build some scalable and awesome skills!

In the next post, we’ll talk about taking this one step closer to avoid that gross switch statement and simply register our Handler implementations for certain intents or RequestTypes which is more similar to how the actual ASK SDK works.

Stay tuned!


If you like what you see, don’t forget to follow me on twitter @Suave_Pirate, check out my GitHub, and subscribe to my blog to learn more mobile and AI developer tips and tricks!

Interested in sponsoring developer content? Message @Suave_Pirate on twitter for details.


voicify_logo
I’m the Director and Principal Architect over at Voicify. Learn how you can use the Voice Experience Platform to bring your brand into the world of voice on Alexa, Google Assistant, Cortana, chat bots, and more: https://voicify.com/


Alexa.Tip – Using Entity Framework in Your C# Alexa Skill Lambda

In this Alexa.Tip series, we explore some little bits of code that can make your life easier in developing Alexa Skills in many languages including C# + .NET, node.jS + TypeScript, Kotlin, etc. We look at concepts that developers might not be aware of, design patterns that and how they can be applied to voice application development, best practices, and more!

In the previous Alexa.Tip, we explored Accessing Lambda Environment Variables in .NET in order to access a secure connection string and initialize a DbContext to use.

If you don’t know how to access Lambda Environment variables already, PLEASE read that post first as this post’s samples will NOT show the use of hard coded connection strings – let’s follow some best practices! 😀

Alright, let’s get into it. If you’re developing Alexa Skills in .NET, you probably need to access data somewhere! At least if you’re building a real-world scale voice application. Also, if you’re a .NET developer, you’re probably used to accessing data through Entity Framework at this point rather than using some of the AWS SDKs and data services such as DynamoDB.

It’s super easy…

Initial Skill

First off, this example uses a super basic skill where the only custom intent is to get facts about animals. Here’s the intent setup in the UI:
AnimalFactIntent_Full

You can also find the interactionModel.json here:
https://github.com/SuavePirate/Cross-Platform-Voice-NET/blob/master/src/End/AnimalFacts/AnimalFacts/InteractionModels/alexaInteractionModel.json

Let’s start by abstracting some handlers out so we aren’t writing everything in our Function class – this isn’t JavaScript after all:

WelcomeHandler.cs

public class WelcomeHandler : IResponseHandler
{
    public SkillResponse GetResponse(SkillRequest input)
    {
        return ResponseBuilder.Ask("Welcome to the animal facts voice app! You can ask me about all kinds of animals - try saying, tell me about dogs.");
    }
}

AnimalFactHandler.cs

public class AnimalFactHandler : IAsyncResponseHandler
{
    public async Task<SkillResponse> GetResponse(SkillRequest input)
    {
        // TODO: Do something with data to get the fact.
    }    
}

Then we can setup our Function:

Function.cs

public class Function
{
    // using these interfaces can help us use something like Moq to unit test this bad boy.
    private readonly IResponseHandler _welcomeHandler;
    private readonly IAsyncResponseHandler _animalFactHandler;

    public Function() 
    {
        _welcomeHandler = new WelcomeHandler();
        _animalFactHandler = new AnimalFactHandler();
    }  

    public async Task<SkillResponse> FunctionHandler(SkillRequest input, ILambdaContext context)
    {
        var requestType = input.GetRequestType();

        if (requestType == typeof(IntentRequest))
        {
            if ((input.Request as IntentRequest).Intent.Name == "AnimalFactIntent")
            { 
                return await _animalFactHandler.GetResponse(input);
            }
        }
        else if (requestType == typeof(Alexa.NET.Request.Type.LaunchRequest))
        {
            return _welcomeHandler.GetResponse(input);
        }    

        return ResponseBuilder.Ask("I'm not sure I know how to do that. Try asking me for an animal fact!");
    }
}

So we have a basic setup, but we need to actually implement something in the AnimalFactHandler. In this case, we want to do a SQL search for a fact about the animal that was asked about!

SO let’s start wiring up Entity Framework to this skill:

Add Models and Context

Let’s create a model for our AnimalFact entity to represent our table:

AnimalFact.cs

public class AnimalFact
{
    public int Id { get; set; }
    public string AnimalName { get; set; }
    public string Fact { get; set; }
}

And now let’s create a DbContext implementation with our AnimalFact:

AnimalContext

public class AnimalContext : DbContext
{
    public DbSet<AnimalFact> AnimalFacts { get; set; }
    public AnimalContext(DbContextOptions options)
        : base(options)
    {

    }

    public AnimalContext()
    {

    }
}

NOTE: If you are NOT also using this AnimalContext in a web app that handles the migrations, you’ll need to add either a web app or a console project with .NET Core to handle the migrations since it needs to be an executable project type. The assumption here is that you already have a project running these migrations so you can actually add data to it, but if you are starting here, simply create a new .NET Core web app project or Console app, reference your DbContext from a shared library between the Labmda project and the app project, then run your migrations from the app project.

From here on out, we assume you have the db created from your context and some data in it.

Updating the Skill Lambda

Now that we have a DbContext, let’s add it to our Function and AnimalFactHandler in order to search for the fact!

Let’s go to the AnimalFactHandler and setup the class to take the AnimalContext in the constructor so we can easily unit test and then use the slot value from the request to query for the animal:

AnimalFactHandler.cs

public class AnimalFactHandler : IAsyncResponseHandler
{
    private readonly AnimalContext _context;
    public AnimalFactHandler(AnimalContext context)
    {
        _context = context;
    }

    public async Task<SkillResponse> GetResponse(SkillRequest input)
    {
        // get the animal name from the slot
        var intent = (input.Request as IntentRequest).Intent;
        var animal = intent.Slots["Animal"].Value;

        // query for the fact
        var animalFact = _context.AnimalFacts
                            .Where(a => a.AnimalName.ToLower() == animal.ToLower())
                            .FirstOrDefaultAsync();

        // we found the animal!
        if (animalFact != null)
        {
            return ResponseBuilder.Tell(animalFact.Fact);
        }

        // couldn't find the animal - return a decent response
        return ResponseBuilder.Ask("I don't know about that animal. Try asking me about a different one!");
    }    
}

Now that we have the updated handler, let’s update the entry point to initialize and pass in the AnimalContext.

Function.cs

public class Function
{
    // using these interfaces can help us use something like Moq to unit test this bad boy.
    private readonly IResponseHandler _welcomeHandler;
    private readonly IResponseHandler _animalFactHandler;
    private readonly AnimalContext _context;

    public Function() 
    {
        var connectionString = Environment.GetEnvironmentVariable("DatabaseConnectionString");
        var timeoutSetting = Environment.GetEnvironmentVariable("DatabaseCommandTimeout");
        var optionsBuilder = new DbOptionsBuilder<AnimalFactContext>()
            .UseSqlServer(connectionString, providerOptions => providerOptions.CommandTimeout(int.Parse(timeoutSetting)));
        _context = new AnimalFactContext(optionsBuilder.Build());
        _welcomeHandler = new WelcomeHandler();
        _animalFactHandler = new AnimalFactHandler(_context);
    }  

    public SkillResponse FunctionHandler(SkillRequest input, ILambdaContext context)
    {
        var requestType = input.GetRequestType();

        if (requestType == typeof(IntentRequest))
        {
            if ((input.Request as IntentRequest).Intent.Name == "AnimalFactIntent")
            { 
                return _animalFactHandler.GetResponse(input);
            }
        }
        else if (requestType == typeof(Alexa.NET.Request.Type.LaunchRequest))
        {
            return _welcomeHandler.GetResponse(input);
        }    

        return ResponseBuilder.Ask("I'm not sure I know how to do that. Try asking me for an animal fact!");
    }
}

Now we can publish this and check out our results!

Results

For example, I’ll use Swagger to create an animal fact, and then ask for it!

Boom – created:
create_dog_fact.PNG

And now let’s ask for it!

dog_fact_response

Conclusion

Adding data-driven responses to your custom Alexa Skills is dead easy using techniques you may already be familiar with if you are a .NET web developer! Show me what you’ve built with .NET and Alexa in the comments!


If you like what you see, don’t forget to follow me on twitter @Suave_Pirate, check out my GitHub, and subscribe to my blog to learn more mobile and AI developer tips and tricks!

Interested in sponsoring developer content? Message @Suave_Pirate on twitter for details.


voicify_logo
I’m the Director and Principal Architect over at Voicify. Learn how you can use the Voice Experience Platform to bring your brand into the world of voice on Alexa, Google Assistant, Cortana, chat bots, and more: https://voicify.com/


Alexa.Tip – Access Lambda Environment Variables in .NET

In this Alexa.Tip series, we explore some little bits of code that can make your life easier in developing Alexa Skills in many languages including C# + .NET, node.jS + TypeScript, Kotlin, etc. We look at concepts that developers might not be aware of, design patterns that and how they can be applied to voice application development, best practices, and more!

In this post, we’ll look at a simple tip to help secure your Alexa Skills when using an AWS Lambda. In a future post, we’ll look at a similar concept in .NET for developers using ASP.NET Core Web API instead of Lambdas.

So, you’ve taken the step to building proper data-driven Alexa Skills and have stepped out of the simple “todo” examples. Perhaps you need a database connection in your source code, need to change values depending on what environment you are running the skill in, or want to run your skill with options you can change without having to redeploy the codebase over and over again.

For all of these problems, your best bet is to use the Lambda Environment variables. Doing it is INCREDIBLY simple, yet I still see many developers unaware of how to use them and instead use runtime checks or don’t bother scaling their application at all to needing them.

In this example, we’ll look at how to create an instance of an Entity Framework DbContext and set it up for a testable injection based project.

Let’s look at a code snipet example of a piece of an Alexa Skill running in a .NET Lambda using a hard coded connection string:

Message.cs

// a simple table to represent some messages we can grab
public class Message
{
    public int Id { get; set; }
    public string Content { get; set; }
}

And here’s our DbContext we are going to grab data from:
MessageDbContext.cs

public class MessageDbContext : DbContext 
{
    public DbSet<Message> Messages { get; set; }

    public MessageDbContext(DbContextOptions options) : base(options) { }
}

Now check out a lambda I typically see with hard coded connection strings and settings:

BadLambda.cs

public class BadLambda
{
    // an EF DbContext with some message tables
    private readonly MessageDbContext _context;

    public BadLambda()
    {
        var optionsBuilder = new DbOptionsBuilder<MessageDbContext>()
            .UseSqlServer("my_connection_string", providerOptions => providerOptions.CommandTimeout(60));
        _context = new MessageDbContext(optionsBuilder.options);
    }

    public async Task<SkillResponse>(SkillRequest input)
    {
        var message = await _context.Messages.FirstOrDefaultAsync();
        return ResponseBuilder.Tell(message.Content);
    }
}

So breaking down the code… We have an EF DbContext with one table called “Messages” which has a column of Id and Content, and our Skill Lambda sets up the DbContext with a hard coded connection string and timeout setting, then returns the first messages as a simple response.

Let’s take this lambda and add environment variables so we can run mutliple environments for multiple dbs including a localhost db if we wanted to test locally before deploying to Lambda and so we can test updates before we make changes to our production skill!

In AWS

Head over to your lambda in AWS and scroll down to “Environment Variables”:
Labmda_env

Here you can add any key-value pairs you want. For this demo, we want to put our database connection string and our timeout setting here:

Lambda_env_filled

Now make sure you smash that save button and head back to Visual Studio to make our final updates!

Don’t forget you can now also create another lambda for a development or staging environment separate from your production lambda – be sure to use a different database connection in your environment variables, and then you can publish to both 😀

In the Code

Now we just have to use the

Environment.GetEnvironmentVariable(string key);

method to grab the values of these environment variables we set up and we’re off to the races!

Here’s what that looks like when updates:

GoodLambda.cs

public class GoodLambda
{
    // an EF DbContext with some message tables
    private readonly MessageDbContext _context;

    public GoodLambda()
    {
        var connectionString = Environment.GetEnvironmentVariable("DatabaseConnectionString");
        var timeoutSetting = Environment.GetEnvironmentVariable("DatabaseCommandTimeout");
        var optionsBuilder = new DbOptionsBuilder<MessageDbContext>()
            .UseSqlServer(connectionString, providerOptions => providerOptions.CommandTimeout(int.Parse(timeoutSetting)));
        _context = new MessageDbContext(optionsBuilder.options);
    }

    public async Task<SkillResponse>(SkillRequest input)
    {
        var message = await _context.Messages.FirstOrDefaultAsync();
        return ResponseBuilder.Tell(message.Content);
    }
}

Now publish it to your lambda and you’re done!

Recap

  • For the love of god, stop hard coding connection strings and settings in your lambda
  • Use environment variables
  • Setup multiple environments for scalability and testability
  • Abuse Environment.GetEnvironmentVariable()
  • Build more Alexa Skill 🙂

If you like what you see, don’t forget to follow me on twitter @Suave_Pirate, check out my GitHub, and subscribe to my blog to learn more mobile and AI developer tips and tricks!

Interested in sponsoring developer content? Message @Suave_Pirate on twitter for details.


voicify_logo
I’m the Director and Principal Architect over at Voicify. Learn how you can use the Voice Experience Platform to bring your brand into the world of voice on Alexa, Google Assistant, Cortana, chat bots, and more: https://voicify.com/


Alexa.Tip – Build Better Responses in .NET With SSML

In this Alexa.Tip series, we explore some little bits of code that can make your life easier in developing Alexa Skills in many languages including C# + .NET, node.jS + TypeScript, Kotlin, etc. We look at concepts that developers might not be aware of, design patterns that and how they can be applied to voice application development, best practices, and more!

In this post, we are looking at a VERY simple, but useful tool when developing Alexa Skills – SSML or Speech Synthesis Markup Language.

If you’re new to voice application development, SSML is a common standard among all the big players – Alexa, Google, Cortana, etc. At its simplest form, it’s a simple set of XML elements that are used to tell the Voice Assistant (such as Alexa) how to speak your response in a particular way. The alternative to using SSML is to return simple text as a string and let the assistant respond with their normal speech. However, this commonly falls short on things like:

  • Abbreviations
  • Dates
  • Emphasis
  • Pauses
  • Tone
  • Pitch

This is especially true when the assistant is reading out a particularly long set of text. It becomes too… robotic. Ironically…

So let’s look at an example of a C# and .NET response using simple text:

Function.cs

public SkillResponse SimpleTextResponse()
{
    return ResponseBuilder.Tell(new PlainTextOutputSpeech
    {
        Text = "When one door of happiness closes, another opens; but often we look so long at the closed door that we do not see the one which has been opened for us."
    });
}

With a response like this, Alexa will likely read it too quickly which can really diminish the power behind such a great quote (by Helen Keller).

Now we can very easily update a response like this to give ourselves something more powerful:

Function.cs

public SkillResponse RichTextResponse()
{
    return ResponseBuilder.Tell(new SsmlOutputSpeech
    {
        Ssml = 
            @"<speak>
                When <emphasis level=""moderate"">one</emphasis> door of happiness closes, another opens;
                <break time=""1.5s""/>
                <s>but often we look so long at the <emphasis level=""strong"">closed</emphasis> door that we do not see the one which has been opened for us.</s>
            </speak>"
    });
}

Now with this, we can add emphasis of different levels on certain words, add breaks in the speech when we need to, and separate contextual sentences!

For a full list of SSML tags that Alexa supports check this out:
https://developer.amazon.com/docs/custom-skills/speech-synthesis-markup-language-ssml-reference.html

And be sure to check back for more intro to expert level tips on Alexa Skill development!
Or take a look at other posts in the Alexa.Tip series here!

Side note: I’m also working on a tool to make building SSML responses even better – especially for very large and dynamic pieces of conversations. The idea is to build a more Fluid Design approach for something like this:

// returns a string
return SsmlBuilder.Speak("When")
    .Emphasis("one", Emphasis.Moderate)
    .Speak("door of hapiness closes, another opens;)
    .Break(1.5)
    .Sentence("but often we look so long at the closed door that we do not see the one which has been opened for us.")
    .Build();

Or something like:

// returns a string - uses string searching
return SsmlBuilder.Speak("When one door of happiness closes, another opens; but often we look so long at the closed door that we do not see the one which has been opened for us.")
    .Emphasis("one", Emphasis.Moderate)
    .Break(";")
    .Sentence("but often we look so long at the closed door that we do not see the one which has been opened for us.")
    .Emphasis("closed", Emphasis.Strong)
    .Build();

Or:

// returns a string - uses indexes and lengths
return SsmlBuilder.Speak("When one door of happiness closes, another opens; but often we look so long at the closed door that we do not see the one which has been opened for us.")
    .Emphasis(4, 3, Emphasis.Moderate)
    .Break(47)
    .Sentence(49, 112)
    .Emphasis(59, 6, Emphasis.Strong)
    .Build();

Let me know what you think in the comments or on twitter @Suave_Pirate – Would you rather build SSML Responses like this or is writing the XML in a big fat string working alright for you?


If you like what you see, don’t forget to follow me on twitter @Suave_Pirate, check out my GitHub, and subscribe to my blog to learn more mobile and AI developer tips and tricks!

Interested in sponsoring developer content? Message @Suave_Pirate on twitter for details.


voicify_logo
I’m the Director and Principal Architect over at Voicify. Learn how you can use the Voice Experience Platform to bring your brand into the world of voice on Alexa, Google Assistant, Cortana, chat bots, and more: https://voicify.com/


Alexa.Tip – How to Host Alexa Skills in Azure

If you’re a .NET developer in the Azure cloud sphere and want to start dabbling in Alexa Skill Development, you don’t have to uproot your entire career and development process to go learn AWS, how Lambdas work, the serverless lifecycle, etc. In this post, we’ll go over just how easy it can be to build an Alexa Skill using C#, ASP.NET Core, and Azure!

The traditional setup for Alexa Skills is:
– AWS Lambda
– .NET Core Lambda project template

But we’re going to be using:
– Azure App Services
– ASP.NET Core API project template

NOTE: This is not an introduction into how Alexa skills work, or how to create your very first skill. This is meant to provide options for hosting your skills, and for how to build skills in general using .NET. If you’re BRAND new to Alexa Skill development, start by reading through their documentation (mostly using node.js, but focus on the structure of an interaction model, what intents and slots are, etc.)

For source of the entire project checkout: https://github.com/SuavePirate/Alexa.NET.WebApi

Step 1 – Create an Alexa Developer Account

If you haven’t already created an Alexa Developer account, you’ll need one in order to register and test your skill.

Simply follow, the Amazon documentation on how to do this – super simple: https://developer.amazon.com/alexa

Step 2 – Create a Skill in the Developer Console

With your Alexa developer account, create a new Skill.

Choose Custom Skill:

create_skill

Then choose the empty “Start from Scratch” template:

choose_template

Now you can manage your interaction model.

For this example, we are going to create a skill that let’s users ask for information about Animals. We’ll use a custom Intent for this, but use the built in AMAZON.Animal slot.

On the left side, go to JSON Editor and paste this interaction model. You can make adjustments as you see fit:

interactionModel.json

{
  "interactionModel": {
    "languageModel": {
      "invocationName": "animal facts",
      "intents": [
        {
          "name": "AMAZON.FallbackIntent",
          "samples": []
        },
        {
          "name": "AMAZON.CancelIntent",
          "samples": [
            "I'm all set"
          ]
        },
        {
          "name": "AMAZON.HelpIntent",
          "samples": []
        },
        {
          "name": "AMAZON.StopIntent",
          "samples": [
            "Quit",
            "Goodbye"
          ]
        },
        {
          "name": "AnimalFactIntent",
          "slots": [
            {
              "name": "Animal",
              "type": "AMAZON.Animal"
            }
          ],
          "samples": [
            "I'd like to know about {Animal}",
            "What is an {Animal}",
            "Give me information about the {Animal}",
            "Tell me about {Animal}"
          ]
        }
      ],
      "types": []
    }
  }
}

This allows our users to ask things such as “Tell me about Monkeys” and then use the animal they are asking for to send information back to them!

Step 3 – Create the ASP.NET Core API

In Visual Studio, create a new project and choose the ASP.NET Core Web Application:

aspnetcore

In the next dialog, select the API template, and be sure that HTTPS is enabled:

API_project_with_https

With your new web application, you’ll need to install the Alexa.NET Nuget Package from Tim Heuer
https://www.nuget.org/packages/Alexa.NET/1.5.5-pre

This nuget package has models for the JSON that Alexa sends to your API and a convenient fluid API design for building your responses that is similar to how the actual Alexa Java and JavaScript SDKs work.

Now that the Alexa models are available, let’s create a new API controller:

AlexaController.cs

[Route("api/[controller]")]
public class AlexaController : Controller
{
    /// <summary>
    /// This is the entry point for the Alexa skill
    /// </summary>
    /// <param name="input"></param>
    /// <returns></returns>
    [HttpPost]
    public SkillResponse HandleResponse([FromBody]SkillRequest input)
    {
        var requestType = input.GetRequestType();

        // return a welcome message
        if(requestType == typeof(LaunchRequest))
        {
            return ResponseBuilder.Ask("Welcome to animal facts, ask me about information on an animal", null);
        }

        // return information from an intent
        else if (requestType == typeof(IntentRequest))
        {
            // do some intent-based stuff
            var intentRequest = input.Request as IntentRequest;

            // check the name to determine what you should do
            if (intentRequest.Intent.Name.Equals("AnimalFactIntent"))
            {
                // get the slots
                var animal = intentRequest.Intent.Slots["Animal"].Value;
                if(animal == null)
                    return ResponseBuilder.Ask("You forgot to ask about an animal! Please try again.", null);

                return ResponseBuilder.Tell($"I would normally tell you facts about ${animal} but I'm not a real skill yet.");
            }
        }

        return ResponseBuilder.Ask("I didn't understand that, please try again!", null);
    }
}

This controller contains a single HTTP POST endpoint that takes in an SkillRequest. It then breaks down the request in order to respond accordingly. So if the user opens the skill which initiates the LaunchRequest, we can give them a welcome message with hints on what they can ask about. Then if they ask for information about an animal, we can handle the IntentRequest with the intent name of “AnimalFactIntent” and use the Animal slot value!

That’s all there is too it! I’d normally suggest abstracting this out of using the controller so that it is more easily testable with unit tests, but for the sake of a simple example, it will work fine.

Step 4 – Publish to Azure App Service

Now that we have our ASP.NET Core project, we need to publish it to an Azure App Service. You can do this directly in Visual Studio or in the Azure portal. For the sake of this example, we’ll do it directly in Visual Studio – assuming you have a valid Azure license and account setup.

From the Solution Explorer – right click your project and Select “Publish”.

Select the “App Service” option and click “Create”.

Then fill out the form to create a new App Service:
AzurePublish

Once your publish is done, you’ll need to ensure that HTTPS / SSL is configured correctly for your app service.

In the Azure portal, go to your new App Service, then scroll to the SSL Settings section.

Be sure that you enforce SSL (Alexa requires endpoints to use HTTPS with trusted certificates. The default App Service SSL cert is signed with Microsoft’s trusted certificate which means that Amazon will accept it).

azure_ssl.PNG

Now make sure that you can hit your App service API endpoint. I usually prefer to enable Swagger for my API using Swashbuckle for this: https://docs.microsoft.com/en-us/aspnet/core/tutorials/getting-started-with-swashbuckle?view=aspnetcore-2.1&tabs=visual-studio%2Cvisual-studio-xml

Step 5 – Register Endpoint with Alexa Skill

Now that we have our App Service with HTTPS set up, we need to go back to the Alexa Developer Console and to the skill. In the left menu, scroll down to the “Endpoint” option.

In the main view, select “HTTPS” instead of “AWS Lambda ARN”. Then enter the URL for the endpoint in your app service and choose the subdomain ssl cert option:
azure_alexa_endpoint

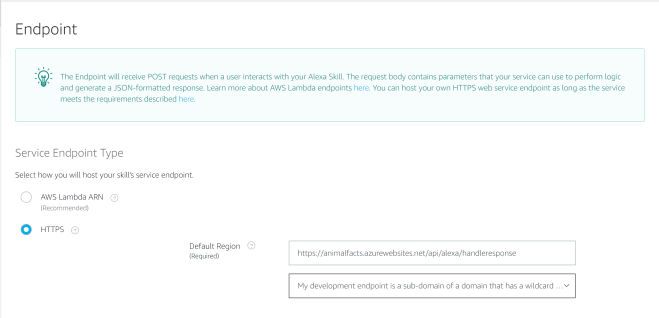
Once this is done, you can save, and build your skill then proceed to test it!

Step 6 – Test

In the Alexa Developer Console, go to your skill and select the “Test” tab. Here you can type or say things like “Open Animal Facts” or “Ask Animal Facts to tell me about Monkeys”.

animal skill test

Here you can also view the JSON that Alexa is sending to your skill and use that to test against your skill directly using something like Swagger or Postman.

Here’s an example JSON input you could use to test:

{
    "version": "1.0",
    "session": {
        "new": false,
        "sessionId": "...",
        "application": {
            "applicationId": "..."
        },
        "user": {
            "userId": "..."
        }
    },
    "context": {
        "AudioPlayer": {
            "playerActivity": "IDLE"
        },
        "Display": {
            "token": ""
        },
        "System": {
            "application": {
                "applicationId": "..."
            },
            "user": {
                "userId": "..."
            },
            "device": {
                "deviceId": "...",
                "supportedInterfaces": {
                    "AudioPlayer": {},
                    "Display": {
                        "templateVersion": "1.0",
                        "markupVersion": "1.0"
                    }
                }
            },
            "apiEndpoint": "https://api.amazonalexa.com",
            "apiAccessToken": "..."
        }
    },
    "request": {
        "type": "IntentRequest",
        "requestId": "...",
        "timestamp": "2018-09-04T17:07:45Z",
        "locale": "en-US",
        "intent": {
            "name": "AnimalFactIntent",
            "confirmationStatus": "NONE",
            "slots": {
                "Animal": {
                    "name": "Animal",
                    "value": "monkeys",
                    "confirmationStatus": "NONE"
                }
            }
        }
    }
}

You can also test on a real Alexa device! Once you enabled testing, any device that is assigned to the same email address as your Alexa Developer Account will have it enabled.

And that’s it! Now get out there and build some Alexa Skills in .NET!


If you like what you see, don’t forget to follow me on twitter @Suave_Pirate, check out my GitHub, and subscribe to my blog to learn more mobile and AI developer tips and tricks!

Interested in sponsoring developer content? Message @Suave_Pirate on twitter for details.


voicify_logo
I’m the Director and Principal Architect over at Voicify. Learn how you can use the Voice Experience Platform to bring your brand into the world of voice on Alexa, Google Assistant, Cortana, chat bots, and more: https://voicify.com/