CodeMash 2020 This Week!

This week I’ll be at CodeMash – an amazing developer event at the Kalahari Resort in Ohio. CodeMash holds a special place in my heart; It’s the first developer conference I ever attended, the first I ever sponsored, and now I have the honor of being a speaker!

This year, I’ll be talking more about Kotlin for C# developers, and you can catch the session at 9:15 am on Thursday.

Annotation 2020-01-06 113339

If you’re looking to expand your language portfolio with something familiar yet new as a C# developer, you’re going to love this session. Learn about the Kotlin programming language side-by-side with C#, compare and contrast both languages’ amazing features and tooling and walk away with the confidence to to explore and build more with both languages and stacks.

Check out the schedule and other speakers here: https://www.codemash.org/

If you’re at the conference or the area, let me know! I’d love to chat.


If you like what you see, don’t forget to follow me on twitter @Suave_Pirate, check out my GitHub, and subscribe to my blog to learn more mobile developer tips and tricks!

Interested in sponsoring developer content? Message @Suave_Pirate on twitter for details.

Advertisement

Techorama This Week – Kotlin, C#, Flux, Design Patterns, and more!

If you’re in the Netherlands this week, come catch me at Techorama! I’ll be there from the 30th through the 3rd of October and presenting two different sessions:

techorama_sessions

On the 1st, I’ll be speaking on Kotlin for C# Developers:

Dive into the latest craze in languages and platforms – Kotlin. This time we will be looking at it from the perspective of a .NET C# developer, draw comparisons between the languages, and bridge the gap between these 2 amazing languages. We’ll look at: – Kotlin as a language – Platforms Kotlin is great for – Object Oriented Implementations in Kotlin – Extended Features – Features Kotlin has that C# doesn’t – A demo Android application in Kotlin vs a Xamarin.Android app in C# In the end you will leave with a foundational knowledge of Kotlin and its capabilities to build awesome apps with less code. You should feel comfortable comparing C# applications to Kotlin applications and know where to find resources to learn even more!
And on the 2nd I have another morning session on implementing the Flux design pattern in C# and .NET:
Learn about the Flux design pattern and how to implement it in your C# client applications like UWP, Xamarin, and all the other platforms .NET is touching now. We’ll compare Flux and Uni-Directional data flows to the existing tools and directions development takes us in C# client apps and talk about all the pros and cons that come with both. We’ll take an existing Xamarin.Forms app using MVVM and “Flux it Up” to migrate to a more 1-direction flow of data and actions. When you leave, you’ll have a solid understanding of Flux and some of its existing implementations such as Redux and be confident in implementing it yourself in C#!

Pre-conference Meetup

If you’re not going to Techorama this year, but are still in the area, you can find me tomorrow at the Dutch Mobile .NET Developers meetup with some of the other amazing people from the Xamarin and .NET Community. I’ll be on a panel talking about mobile technologies and practices!

2019 Meetup – Xamarin with David Ortinau & Mobile Expert Panel

Monday, Sep 30, 2019, 6:00 PM

Info Support
Kruisboog 42 Veenendaal, NL

50 Code monkeys Attending

18:00 Doors open & Dinner 19:00 – 20:00 *The Latest and Craziest for Mobile .NET Developers* David Ortinau @davidortinau Microsoft has been hard at work improving Visual Studio and Xamarin for mobile developers. I’ll demo the latest features you can use to make your dev experience better today. And in the future? Microsoft has some “coming soon” as…

Check out this Meetup →


Here’s the schedule:

18:00 Doors open & Dinner
19:00 – 20:00 The Latest and Craziest for Mobile .NET Developers
David Ortinau @davidortinau
Microsoft has been hard at work improving Visual Studio and Xamarin for mobile developers. I’ll demo the latest features you can use to make your dev experience better today. And in the future? Microsoft has some “coming soon” as well as highly experimental projects that are “must see”!

20:00 – 20:15 Break
20:15 – 21:00 Mobile Expert Panel with Alex, Brandon, Dan & Gerald
Open Q&A for these mobile experts that have absolutely made their mark in the mobile developer space. This is your chance to ask anything you’d like! Joining us are:

Alex Dunn @suave_pirate
Author at Pluralsight | Xamarin MVP | Microsoft MVP

Brandon Minnick @thecodetraveler
Microsoft Developer Advocate | Mobile App Developer

Dan Siegel @danjsiegel
Microsoft MVP | @PrismLib Maintainer | Xamarin Evangelist | @XamDevSummit Organizer

Gerald Versluis @jfversluis
Engineer @Microsoft for #XamarinForms | Former Microsoft MVP

21:00 Drinks & Closing


See ya’ll there!


If you like what you see, don’t forget to follow me on twitter @Suave_Pirate, check out my GitHub, and subscribe to my blog to learn more mobile developer tips and tricks!

Interested in sponsoring developer content? Message @Suave_Pirate on twitter for details.

Video – Kotlin for C# Developers at NDC Oslo

In June, I had the amazing privilege of giving a talk at NDC Oslo called “Kotlin for C# Developers”! Lucky for you, NDC records all of their sessions, so you can check out the recording from YouTube right here 🙂

Dive into the latest craze in languages and platforms – Kotlin. This time we will be looking at it from the perspective of a .NET C# developer, draw comparisons between the languages, and bridge the gap between these 2 amazing languages.

We’ll look at:
– Kotlin as a language
– Platforms Kotlin is great for
– Object Oriented Implementations in Kotlin
– Extended Features
– Features Kotlin has that C# doesn’t
– A demo Android application in Kotlin vs a Xamarin.Android app in C#

In the end you will leave with a foundational knowledge of Kotlin and its capabilities to build awesome apps with less code. You should feel comfortable comparing C# applications to Kotlin applications and know where to find resources to learn even more!

Let me know your thoughts in the comments or on Twitter, and check out my other content on Kotlin here: https://alexdunn.org/tag/kotlin/

Want to see this live? I’ll be giving an updated version of this talk at Techorama Netherlands in September/October along with an introduction to the Flux design pattern in C#.

Check those out here:

If you prefer to just jump right into a language / platform – I would happily suggest my Pluralsight course – Building Android Apps with Kotlin: Getting Started. Take a look here: https://app.pluralsight.com/library/courses/building-android-apps-kotlin-getting-started/


If you like what you see, don’t forget to follow me on twitter @Suave_Pirate, check out my GitHub, and subscribe to my blog to learn more mobile and AI developer tips and tricks!

Interested in sponsoring developer content? Message @Suave_Pirate on twitter for details.


voicify_logo
I’m the Director and Principal Architect over at Voicify. Learn how you can use the Conversation Experience Platform to bring your brand into the world of voice on Alexa, Google Assistant, Cortana, chat bots, and more: https://voicify.com/


NDC Oslo Coming Up!

Just a quick post today to tell you all how excited I am for the next event I’ll be at:

NDC, one of my absolute favorite conference series is going to be running their original NDC Oslo conference in the next couple weeks! As always, I’m so humbled to be among some of the most amazing people in the Software industry that I personally have learned so much from. I hope to be able to share my experiences and learnings with you all in return!

I’ll be speaking about two of my favorite programming languages, Kotlin and C#! If you’re a C# developer and are interested in learning more about Kotlin and what’s been going on with one of the hottest new languages, come check out my session where we will intro Kotlin, compare features of the language, and even talk about how they might play well together in the future! If you don’t come for the languages, come for the stickers! I’m coming in hot with some awesome Kotlin, Xamarin, and C# stickers.

If you aren’t coming to NDC Oslo, be sure to check out my Kotlin posts here as well as check out my course on Pluralsight – Building Andorid Apps with Kotlin: Getting Started to learn about how to apply Kotlin to building native Android apps with the latest and greatest tools!

You can also checkout an older version of my Kotlin for C# Developers talk from NDC London here. https://www.youtube.com/watch?v=pR8zPYlNU0k

Can’t wait! See you there!


If you like what you see, don’t forget to follow me on twitter @Suave_Pirate, check out my GitHub, and subscribe to my blog to learn more mobile developer tips and tricks!

Interested in sponsoring developer content? Message @Suave_Pirate on twitter for details.

Kotlin for C# Developers – Asynchronous Programming

Series Introduction

With my recent work in Kotlin in the last few years and my continuing work in C# throughout my entire professional career, I’m often asked to compare the two languages. This sparked the creation of my latest conference session – Kotlin for C# Developers.

The next time I’m giving this talk is at NDC London – https://ndc-london.com/talk/kotlin-for-c-developers/

But I figured some blog posts on the subject would be a great tool to sit alongside the talk. The goal of this comparison is to give C# developers some easy ways to get into Kotlin without having to dive in and build something real. Start with the building blocks you know and draw comparisons to one of the coolest languages on the market.

If you prefer to just jump right into a language / platform – I would happily suggest my Pluralsight course – Building Android Apps with Kotlin: Getting Started. Take a look here: https://app.pluralsight.com/library/courses/building-android-apps-kotlin-getting-started/

C# Async Await

C# has done arguably the best job at simplifying asynchronous programming for developers. We now hardly have to think about thread management, opening, closing, splitting, etc. We can just toss around some async, await, and Task and we’re basically good to go. As long as you’re using it properly all the way through your application, async asyncing all the way through, then you should easily be able to avoid lost threads, race conditions, etc.

If you’re new to async await in C#, here is a quick example of a process that sets a list of dogs entirely in the background (although done unsafely, it’s just a quick dummy sample).

public class DogAdoptionService
{
    List<AdoptableDog> dogs;

    public async Task<List<AdoptableDog>> GetAdoptableDogsAsync()
    {
        var dogJson = await new HttpClient().GetStringAsync("http://mydogservice.azurewebsites.net");
        return JsonConvert.DeserializeObject<List<AdoptableDog>>(dogJson);
    }
    public void BackgroundGet()
    {
        Task.Run(async () => dogs = await GetAdoptableDogsAsync());
    }
}

Kotlin Coroutines

Kotlin’s concept of asynchronous programming takes a different approach, but one that is just as easy to follow and use. They call it Coroutines. I know, I know, they missed an opportunity to call it Koroutines, but still…. they’re great!

class DogAdoptionService {
    var dogs: List<AdoptableDog>? = null
    fun getAdoptableDogs(): List<AdoptableDog> {
        var json = URL("http://mydogservice.azurewebsites.net").readText()
        val listType = object : TypeToken<List<AdoptableDog>>() { }.type
        return Gson().fromJson(json, listType)
    }

    fun getAdoptableDogsInBackground() {
        GlobalScope.launch {
            dogs = getAdoptableDogs()
        }
    }
}

Side note: this really isn’t the best way to make an HTTP GET request in Kotlin, but I wanted to make it as symmetrical as possible between my C# example.

In this example, we launch a new coroutine from the GlobalScope that executes the long running getAdoptableDogs() function. One thing coroutines does that is different from other simple async await style programming is making it easier to create and manage different scopes of your coroutines if you wish. Of course, you can still launch many different coroutines from GlobalScope as well as manage heavy concurrencies.

The docs on Kotlin Coroutines actually has some awesome and simplified examples so I definitely recommend checking that out.
https://kotlinlang.org/docs/reference/coroutines-overview.html

If you wanted to essentially await a coroutine from within another or from within the main thread, all you have to do is get a reference to the coroutine and call .join() on it.

Here’s how that would look in our previous example:

class DogAdoptionService {
    var dogs: List<AdoptableDog>? = null
    fun getAdoptableDogs(): List<AdoptableDog> {
        var json = URL("http://mydogservice.azurewebsites.net").readText()
        val listType = object : TypeToken<List<AdoptableDog>>() { }.type
        return Gson().fromJson(json, listType)
    }

    fun getAdoptableDogsInBackground() {
        val dogsJob = GlobalScope.launch {
            dogs = getAdoptableDogs()
        }

        dogsJob.join() // now we wait for the coroutine to finish before continuing
        system.out.println(dogs)
    }
}

I won’t bore you with tons and tons of samples of coroutines in different situations since the docs (linked above) already do an incredible job of painting different scenarios.

Conclusion

As we continue looking into Kotlin from the perspective of a C# developer, we see more parallels and similarities – especially in both of their ease of asynchronous programming! Whether it’s async await or coroutines, us as application developers can take our minds off of heavy duty thread management and more on our design patterns and implementations!

Let me know what you think in the comments or on twitter and be sure to check back for more developer updates and Kotlin and C# posts!


If you like what you see, don’t forget to follow me on twitter @Suave_Pirate, check out my GitHub, and subscribe to my blog to learn more mobile developer tips and tricks!

Interested in sponsoring developer content? Message @Suave_Pirate on twitter for details.

Android Kotlin Basics – Lazy Loading Images with Picasso

About This Series

This “Android Kotlin Basics” blog series is all about fundamentals. We’ll take a look at the basics of building Android apps with Kotlin from the SUPER basics, to the standard basics, to the not-so-basics. We’ll also be drawing comparisons to how things are done in Kotlin vs. Java and some other programming languages to build Android apps (like C# and Xamarin or JavaScript/TypeScript for Hybrid implementations).

Find other posts in this series: Android Kotlin Basics

Check Out the Pluralsight Course!

If you like this series, be sure to check out my course on Pluralsight – Building Android Apps with Kotlin: Getting Started where you can learn more while building your own real-world application in Kotlin along the way. You can also join the conversation and test your knowledge throughout the course with learning checks through each module!

Watch it here: https://app.pluralsight.com/library/courses/building-android-apps-kotlin-getting-started/table-of-contents

Lazy Loading Images with Picasso

Loading images from remote sources without help can be a pain in Android development. You need to make the http request against the url, download the bytes of the image, create a Bitmap from those bytes, then render that BitMap in an ImageView. Not only is that tedious, but it also leaves room for tons of errors and especially the dreaded OutOfMemoryException that happens oh so often when trying to render large images in Android.

There are some really great libraries out there for helping face this issue that can also provide some other useful tools such as filtering, extensions, customizing, and more.

In the course we use Picasso which is a library by Square to help lazy load images. Find it here: http://square.github.io/picasso/

Picasso does a great job loading images asynchronously and handles rendering them with proper scale. It does a great job handling this performance in ListViews and RecyclerViews as well. This is exactly how we use it in our real-world app that we build in the course!

Picasso also has some great features with creating custom transformations or extending the functionality. In this post we will stick to the basics though. If you want to get into details check out the Java documentation at their website. Copy and pasting that into a Kotlin file in Android studio will also automatically translate it for you!

Installing

Picasso can be installed 3 ways:
– Gradle (what we use in the course)
– Maven
– Manual

To install with gradle, add:

implementation 'com.squareup.picasso:picasso:2.71828'

to your build.gradle config.

For maven use:

<dependency>
  <groupId>com.squareup.picasso</groupId>
  <artifactId>picasso</artifactId>
  <version>2.71828</version>
</dependency>

And if you want to do it manually, download the jar from http://square.github.io/picasso/ and reference it in your project.

Basic Image Loading

Now that you have Picasso in your project, lets look at how we can do simple image loading.

Let’s start with a simple layout:

activity_main.xml

<RelativeLayout 
    android:layout_height="match_parent"
    android:layout_width="match_parent">
    <ImageView android:id="@+id/myImageView"
        android:layout_height="match_parent"
        android:layout_width="match_parent" />
</RelativeLayout>

Now in our Activity code, we can load the image from the url in the onCreate override.

class MainActivity : AppCompatActivity() {
    override fun onCreate(savedInstanceState: Bundle?) {
        super.onCreate(savedInstanceState)
        setContentView(R.layout.activity_main)

        // load the image with Picasso
        Picasso
            .with(this) // give it the context
            .load("https://i.imgur.com/H981AN7.jpg") // load the image
            .into(myImageView) // select the ImageView to load it into
    }
}

If you’re unsure of why we didn’t need to call

val myImageView = findViewByid<ImageView>(R.id.myImageView)

Check out my post on how Kotlin automatically maps views to properties by id: Android Kotlin Basics – Auto-mapping Views

And that’s it! Now you have automatically handled all performance concerns, caching needs, sizing and downloading, and so much more!

Using in a RecyclerView

So loading a single image into a single ImageView isn’t so bad on its own, but when you have to load high-res images into large lists that can change all the time, there are a lot of places this can go wrong doing it yourself. Developers often run into:
– Lag on new items appearing
– Mismatched images
– No images loading
– Images loading incorrectly
– Dreaded Out of Memory Exceptions

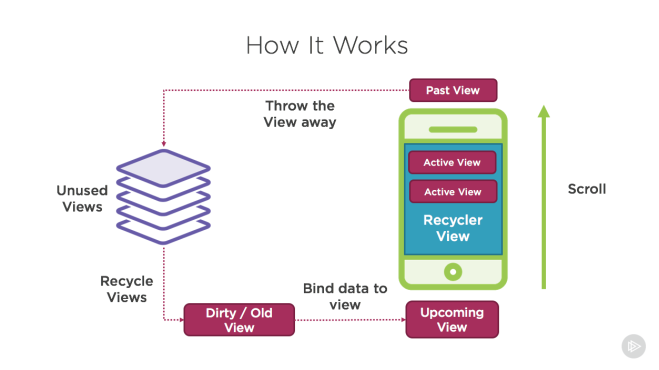
Because Picasso runs the image loading asynchronously and only touches the UI thread when it needs to render the image itself, it avoid the issues of locking the UI up when loading. Because it also caches the images locally, when the image needs to be loaded again (such as scrolling back up), it does so quickly and can void mismatching renderings. Also, because it renders the image in chunks before showing it, they avoid the easy to find Out of Memory Exception that we have all come to hate when trying to render a large image into an ImageView. Normally to avoid this, you have to manually load a scaled down image into memory and handle how you scale it per image. Picasso does all this for us too.

On top of all that, Picasso ships with some of the nice-to-haves such as:
– Transitions when images load or change
– Placeholder images to show while loading from a url
– Transformations on images once loaded
– Debugging indicators to show where the image loaded from

All these great features even scale to these large lists and RecyclerViews.

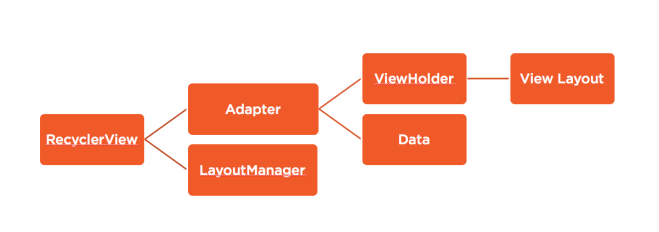
Before showing how to use it in your RecyclerView, be sure to check out the other post in this series: Android Kotlin Basics – RecyclerView and Adapters unless you’re already familiar with how RecyclerViews and Adapters work 🙂

We can create a layout for our item in our list:

image_item.xml

<ImageView android:id="@+id/myImageView"
    android:layout_height="match_parent"
    android:layout_width="match_parent" />

Then a ViewHolder for this image:

ImageHolder.kt

class ImageHolder(itemView: View) : RecyclerView.ViewHolder(itemView) {
    private val myImageView: ImageView = itemView.findViewById<ImageView>(R.id.myImageView)

    fun updateWithUrl(url: String) {
        Picasso.with(itemView.context).load(url).into(myImageView)
    }
}

Now let’s create our Adapter with our datasource:

ImagesAdapter.kt

class ImageAdapter() : RecyclerView.Adapter<ImageHolder>() {
    val imageUrls: Array<string>

    init {
        imageUrls = arrayOf("https://i.imgur.com/kUCMPWX.jpg", "https://i.imgur.com/kUCMPWX.jpg", "https://i.imgur.com/kUCMPWX.jpg", "https://i.imgur.com/kUCMPWX.jpg", "https://i.imgur.com/kUCMPWX.jpg", "https://i.imgur.com/kUCMPWX.jpg", "https://i.imgur.com/kUCMPWX.jpg", "https://i.imgur.com/kUCMPWX.jpg", "https://i.imgur.com/kUCMPWX.jpg", "https://i.imgur.com/kUCMPWX.jpg", "https://i.imgur.com/kUCMPWX.jpg")
    }

    override fun getItemCount(): Int {
        return imageUrls.size;
    }

    override fun onBindViewHolder(holder: ImageHolder?, position: Int) {
        var imageUrl = imageUrls[position]
        holder?.updateWithUrl(imageUrl)
    }

    override fun onCreateViewHolder(parent: ViewGroup?, viewType: Int): ImageHolder {
        var imageItem = LayoutInflater.from(parent?.context).inflate(R.layout.image_item, parent, false)
        return ImageHolder(imageItem)
    }
}

Last we just need to create our Activity and wireup the Adapter!

activity_main.xml

<RelativeLayout 
    android:layout_height="match_parent"
    android:layout_width="match_parent">    
    <android.support.v7.widget.RecyclerView
        android:id="@+id/imageRecycler"
        android:layout_width="match_parent"
        android:layout_height="match_parent"/>
</RelativeLayout>

MainActivity.kt

class MainActivity : AppCompatActivity() {
    override fun onCreate(savedInstanceState: Bundle?) {
        super.onCreate(savedInstanceState)
        setContentView(R.layout.activity_main)

        imageRecycler.layoutManager = LinearLayoutManager(this)
        imageRecycler.adapter = ImageAdapter()
    }
}

Now we can quickly scroll through our list and see the images loaded quickly and properly into our view!

dogs


Also, let me know what else you’d like to learn about with Android and Kotlin! Either drop a comment here or tweet at me @Suave_Pirate!

If you like what you see, don’t forget to follow me on twitter @Suave_Pirate, check out my GitHub, and subscribe to my blog to learn more mobile developer tips and tricks!

Interested in sponsoring developer content? Message @Suave_Pirate on twitter for details.

Android Kotlin Basics – Passing Data Between Activities

About This Series

This “Android Kotlin Basics” blog series is all about fundamentals. We’ll take a look at the basics of building Android apps with Kotlin from the SUPER basics, to the standard basics, to the not-so-basics. We’ll also be drawing comparisons to how things are done in Kotlin vs. Java and some other programming languages to build Android apps (like C# and Xamarin or JavaScript/TypeScript for Hybrid implementations).

Check Out the Pluralsight Course!

If you like this series, be sure to check out my course on Pluralsight – Building Android Apps with Kotlin: Getting Started where you can learn more while building your own real-world application in Kotlin along the way. You can also join the conversation and test your knowledge throughout the course with learning checks through each module!

Watch it here: https://app.pluralsight.com/library/courses/building-android-apps-kotlin-getting-started/table-of-contents

Passing Data Between Activities

This topic is covered in depth in the course above, but in this post, we’ll quickly go over this basic, but very important concept when developing your Android mobile apps.

Let’s break it down first –

I Have No Idea What an “Activity” Is

Not to worry! Here’s the basic idea – it’s a construct (and a class in your code) that represents an entry point for your app and can be called into by your other Activities. You can think of an Activity as a contextual “page”, and thus your app will likely have multiple Activities.

Activities can do a lot, but for simplicity sake, we’ll only talk about the most common implementation which is this idea of a drawing a window of your application.

Starting an Activity

When you create your application, you’ll have to register your Activities to your Android manifest. Doing this tells the operating system which Activities you have in your app, where to find them, what they can do, and some other information we won’t get into in this topic.

That looks something like this:

AndroidManifest.xml

<manifest xmlns:android="http://schemas.android.com/apk/res/android"
    package="org.alexdunn.wikipedia">
    <uses-permission android:name="android.permission.INTERNET"/>
    <application
        android:name=".WikiApplication"
        android:allowBackup="true"
        android:icon="@mipmap/ic_launcher"
        android:label="@string/app_name"
        android:roundIcon="@mipmap/ic_launcher_round"
        android:supportsRtl="true"
        android:theme="@style/AppTheme.NoActionBar">
        <activity
            android:name=".activities.MainActivity"
            android:label="@string/title_activity_main">
            <intent-filter>
                <action android:name="android.intent.action.MAIN" />

                <category android:name="android.intent.category.LAUNCHER" />
            </intent-filter>
        </activity>
        <activity android:name=".activities.ArticleDetailActivity"></activity>
        <activity android:name=".activities.SearchActivity"></activity>
    </application>

</manifest>

This is a manifest with 3 Activities, MainActivity, SearchActivity, and ArticleDetailActivity.

Once all Activities are registered in the Manifest, we can start any of them from any other.

Let’s look at a quick example where we are in the MainActivity and want to start the SearchActivity on a button click:

MainActivity.kt

class MainActivity : Activity() {
    override fun onCreate(savedInstanceState: Bundle?) {
        my_button.setOnClickListener {
            // create an "Intent"
            val searchIntent = Intent(this, SearchActivity::class.java)

            // start the activity with the intent
            startActivity(searchIntent)
        }
    }
}

So what’s this Intent object?

An Intent in Android is a construct to tell the operating system that your application is trying to execute something that needs to be communicated back to the application or a different application. This is used for many things outside just starting Activities – it can be used for executing Services, Activities, and BroadcastReceivers.

Here’s a quick diagram on how this works at a basic level:
Screen Shot 2018-03-23 at 11.02.59 AM.png

Adding Data to an Intent

So now we know we use Intents to start Activities (and do other things!), but how do we use them to actually send data to another Activity?

The Intent object has a the concept of a Extras . This means we can add different primitive datatypes to the Extras, or add Serializable data.

Here’s what that looks like in Kotlin!

// 1. create an intent from another activity
val intent = Intent(context, AnotherActivity::class.java)

// 2. put key/value data
intent.putExtra("message", "Hello From MainActivity")

// 3. start the activity with the intent
context.startActivity(intent)

The putExtra has many overloads, so play around with all the types of data you can add.

You can also add Bundles of data to group the data being sent up together:

// 1. create an intent from another activity
val intent = Intent(context, AnotherActivity::class.java)

// 2. put key/value data to bundle
val extras = Bundle()
extras.putString(“message”, “Hello from MainActivity”)
intent.putExtras(extras)

// 3. start the activity with the intent
context.startActivity(intent)

Reading Data From the Intent

Now when we use an intent to start an Activity, and add Extras, we need to be able to read those extras on the new Activity.

This works by using the intent property on the Activity. This intent property is set by the Operating System when starting the Activity, and sets it to the Intent that created it.

We usually use this data in the onCreate override, but you can use it wherever you want!

DetailActivity.kt

class DetailActivity : Activity() {
    override fun onCreate(savedInstanceState: Bundle?) {
        // In onCreate get the value from the auto-mapped “intent”
        val message = intent.getStringExtra(“message”)

        // Or get it from the bundle and auto-mapped “extras”
        val message = intent.extras.getString(“message”)

        // now do something with the message value
    }
}

Conclusion

There’s plenty more you can do with these data structures in Android such as sending over full datatypes and reference types, receiving data back from the detail Activity, and so much more. Be sure to check out my course: Building Android Apps with Kotlin: Getting Started to learn so much more!


Also, let me know what else you’d like to learn about with Android and Kotlin! Either drop a comment here or tweet at me @Suave_Pirate!

If you like what you see, don’t forget to follow me on twitter @Suave_Pirate, check out my GitHub, and subscribe to my blog to learn more mobile developer tips and tricks!

Interested in sponsoring developer content? Message @Suave_Pirate on twitter for details.

Android Kotlin Basics – Camel Case Or Underscore Notation

About This Series

This “Android Kotlin Basics” blog series is all about fundamentals. We’ll take a look at the basics of building Android apps with Kotlin from the SUPER basics, to the standard basics, to the not-so-basics. We’ll also be drawing comparisons to how things are done in Kotlin vs. Java and some other programming languages to build Android apps (like C# and Xamarin or JavaScript/TypeScript for Hybrid implementations).

Check Out the Pluralsight Course!

If you like this series, be sure to check out my course on Pluralsight – Building Android Apps with Kotlin: Getting Started where you can learn more while building your own real-world application in Kotlin along the way. You can also join the conversation and test your knowledge throughout the course with learning checks through each module!

Watch it here: https://app.pluralsight.com/library/courses/building-android-apps-kotlin-getting-started/table-of-contents

Camel Case Or Underscore Notation

I get this type of question quite often – “If the Kotlin Android extensions allow for creating Kotlin members in my Activities, should I be using underscore IDs or camel case”?

If this question doesn’t make sense, first take a look at one of my earlier posts in this series: Android Kotlin Basics – Auto-mapping Views. The short version is that Kotlin ships with Android extensions to create properties in your Activity (and more) for your Views within the layout resource applied in the setContentView call in the onCreate override function.

Here’s the predicament – traditional Android development has set a standard for using underscores for Ids and other properties within xml resources (such as the layouts we are talking about). So that looks like this:

res/layout/activity_main.xml

...

...

Doing this would create a usable EditText property in the associated MainActivity whose name is first_name:

MainActivity.kt

class MainActivity : Activity() {
    override fun onCreate(savedInstance: Bundle?) {
        super.onCreate(savedInstance)
        setContentView(R.layout.activity_main)

        first_name.text = "My First Name!"
    }
}

So the underscore seems to look a bit off in your Kotlin code since every other member and function within a class is typically came cased. So the other option is to start camel casing your xml property values:

res/layout/activity_main.xml

...

...

Doing this would create a usable EditText property in the associated MainActivity whose name is firstName:

MainActivity.kt

class MainActivity : Activity() {
    override fun onCreate(savedInstance: Bundle?) {
        super.onCreate(savedInstance)
        setContentView(R.layout.activity_main)

        firstName.text = "My First Name!"
    }
}

Of course these are just semantics, and I’ve seen projects go either way. I personally use the underscore for Android resources simply because it is still habit, but I may find myself moving more toward camel casing. The argument I hear against moving in that direction is also that the file names themselves use the underscore naming convention, and THAT convention stemmed from an actual restriction in Android development where resource files couldn’t have any uppercased letters. That is no longer really enforced, so it should be fine to name your resource files with a camel case convention as well.

My final suggestion is to simply pick one, but stick to it. Meaning, choose up front when you start your project and be consistent throughout – including your file names. If you want to camelCase, do it everywhere. If you want to underscore_case, do it everywhere. This will allow for onboarding developers easily regardless of which you pick. But who knows… maybe this will sprout another tabs vs spaces type of debate.

Let me know which one you personally prefer!


Also, let me know what else you’d like to learn about with Android and Kotlin! Either drop a comment here or tweet at me @Suave_Pirate!

If you like what you see, don’t forget to follow me on twitter @Suave_Pirate, check out my GitHub, and subscribe to my blog to learn more mobile developer tips and tricks!

Interested in sponsoring developer content? Message @Suave_Pirate on twitter for details.

Android Kotlin Basics – RecyclerView and Adapters

About This Series

This “Android Kotlin Basics” blog series is all about fundamentals. We’ll take a look at the basics of building Android apps with Kotlin from the SUPER basics, to the standard basics, to the not-so-basics. We’ll also be drawing comparisons to how things are done in Kotlin vs. Java and some other programming languages to build Android apps (like C# and Xamarin or JavaScript/TypeScript for Hybrid implementations).

Check Out the Pluralsight Course!

If you like this series, be sure to check out my course on Pluralsight – Building Android Apps with Kotlin: Getting Started where you can learn more while building your own real-world application in Kotlin along the way. You can also join the conversation and test your knowledge throughout the course with learning checks through each module!

Watch it here: https://app.pluralsight.com/library/courses/building-android-apps-kotlin-getting-started/table-of-contents

RecyclerView and Adapters

RecyclerViews are the latest way to display a dynamic collection of data in Android and are what have begun to replace the ListView control. This is because of their built in pattern to “recycle” views… the name makes sense. It also allows for more flexibility in layout and display which we will also talk about here.

In order to use a RecyclerView, you need at least the 4 main parts
1. The RecyclerView itself
2. The Adapter to control what data is tied to what view in the recycler.
3. The ViewHolder to control what view is being used within the recycler
4. The LayoutManager to determine how to layout each view in the recycler.

Together, this relationship looks like this:
Screen Shot 2018-03-01 at 11.13.38 AM

Meaning the RecyclerView needs it’s two root components set – the LayoutManager and Adapter. The adapter then uses the ViewHolder and appropriate data to manipulate the RecyclerView, and the ViewHolder uses an underlying Layout Resource to inflate the view.

In the end the process looks like this:
Screen Shot 2018-03-01 at 11.03.21 AM

Where a user scrolls the list, and as items fall out the top or bottom, they are recycled, cleaned, then re-hydrated with new data from the adapter.

So let’s break down an example of building one of these in Kotlin!

Create a RecyclerView in Your Activity

Let’s first create a simple layout for our MainActivity:
res/layout/activity_main.xml

    <RelativeLayout
        android:layout_width="match_parent"
        android:layout_height="match_parent">
        <android.support.v7.widget.RecyclerView
            android:id="@+id/article_recycler_view"
            android:layout_width="match_parent"
            android:layout_height="match_parent"/>
    </RelativeLayout>

Then using the Kotlin Android Extensions talked about here: Android Kotlin Basics – Auto-mapping Views we can reference our RecyclerView by its id property.

MainActivity.kt

class MainActivity : Activity() {
     override fun onCreate(savedInstanceState: Bundle?) {
        super.onCreate(savedInstanceState)
        setContentView(R.layout.activity_main)

        article_recycler_view.adapter = ??? // we need to create an adapter!
        article_recycler_view.layoutManager = LinearLayoutManager(context)
        // note that in Java we would have to call .setLayoutManager, but Kotlin auto-maps this to a property
     }
}

We’ll come back to this MainActivity once we’ve created our Adapter. But for now we can use the pre-built LinearLayoutManager which will layout the subsequent recycled views Linearly (vertically by default, but it can be set to Horizontal as well).

Create a CardView and ViewHolder

Let’s create the layout resource for our actual article card items, and the ViewHolder to represent it.

res/layout/article_card_item.xml

<?xml version="1.0" encoding="utf-8"?>
<RelativeLayout xmlns:android="http://schemas.android.com/apk/res/android"
    android:layout_width="match_parent"
    android:layout_height="wrap_content"
    xmlns:app="http://schemas.android.com/apk/res-auto">

    <android.support.v7.widget.CardView
        android:layout_height="wrap_content"
        android:layout_width="match_parent"
        android:layout_margin="16dp"
        android:layout_alignParentTop="true"
        android:layout_centerInParent="true"
        android:background="@android:color/white"
        app:cardElevation="4dp">
        <LinearLayout
            android:orientation="vertical"
            android:layout_width="match_parent"
            android:layout_height="wrap_content"
            android:layout_margin="16dp">
            <ImageView
                android:id="@+id/article_image"
                android:layout_width="match_parent"
                android:layout_height="wrap_content"
                android:src="@drawable/ic_image_black_24dp"/>
            <TextView
                android:id="@+id/article_title"
                android:layout_width="match_parent"
                android:layout_height="wrap_content"
                android:layout_marginTop="8dp"
                android:gravity="center"
                android:textAlignment="center"
                android:text="Hello World!"/>
        </LinearLayout>
    </android.support.v7.widget.CardView>
</RelativeLayout>

This is a simple card with an image and title in it that looks something like this:
Screen Shot 2018-03-01 at 2.40.41 PM

And with our view, we will need to create a ViewHolder that our Adapter will use to stick data in it:

CardHolder.kt

class CardHolder(itemView: View) : RecyclerView.ViewHolder(itemView) {
    private val articleImageView: ImageView = itemView.findViewById<ImageView>(R.id.article_image)
    private val titleTextView: TextView = itemView.findViewById<TextView>(R.id.article_title)

    private var currentPage: WikiPage? = null

    fun updateWithPage(page: WikiPage){
        currentPage = page

        titleTextView.text = page.title

        // load image lazily with picasso
        if(page.thumbnail != null)
            Picasso.with(itemView.context).load(page.thumbnail!!.source).into(articleImageView)
    }
}

So here we create a ViewHolder subclass called CardHolder that references its ImageView and TextView that can be initialized right away by querying the passed in itemView property from the constructor. We also add a convenience function to update the ViewHolder and it’s included views with a given WikiPage model (this model is what represents an article from Wikipedia and looks something like this:

WikiPage.kt

class WikiPage {
    var pageid: Int? = null
    var title: String? = null
    var fullurl: String? = null
    var thumbnail: WikiThumbnail? = null
}

WikiThumbnail

class WikiThumbnail {
    val source: String? = null
}

This model is the datatype our Adapter will reference as well.

Lastly, I added a quick reference the the Picasso Library from Square in order to load an image from the thumbnail url into our ImageView.

Creating an Adapter

Now the last thing we need to do is connect our ViewHolder and Data to our RecyclerView by creating our Adapter. Here’s what that will look like:

ArticleCardRecyclerAdapter.kt

class ArticleCardRecyclerAdapter() : RecyclerView.Adapter<CardHolder>() {
    val currentResults: ArrayList<WikiPage> = ArrayList<WikiPage>()

    override fun getItemCount(): Int {
        return currentResults.size
    }

    override fun onBindViewHolder(holder: CardHolder?, position: Int) {
        var page = currentResults[position]
        holder?.updateWithPage(page)
    }

    override fun onCreateViewHolder(parent: ViewGroup?, viewType: Int): CardHolder {
        var cardItem = LayoutInflater.from(parent?.context).inflate(R.layout.article_card_item, parent, false)
        return CardHolder(cardItem)
    }
}

You can see our ArticleCardRecyclerAdapter inherits from the RecyclerView.Adapter and passes in our CardHolder view holder we just created as the type of ViewHolder. This allows for our required override functions to use that CardHolder as its type.

The adapter requires only 3 functions to be overridden, but there are also other functions available to override.
The three required are:
– getItemCount() to return the number of items the RecyclerView will have within it
– onBindViewHolder() to bind the data of a given position to the CardHolder. Here is where we call that updateWithPage function we created in our CardHolder class.
– onCreateViewHolder() to create the initial view holder by inflating a given layout file (which we use to inflate the article_card_item.xml file.

Now that we have our adapter, we can go and update our MainActivity:

MainActivity.kt

class MainActivity : Activity() {
     override fun onCreate(savedInstanceState: Bundle?) {
        super.onCreate(savedInstanceState)
        setContentView(R.layout.activity_main)
        val adapter = ArticleCardRecyclerAdapter()
        adapter.currentResults = ArrayList<WikiPage>()..... // you should load your cards here! 
        article_recycler_view.adapter = adapter
        article_recycler_view.layoutManager = LinearLayoutManager(context)
        // note that in Java we would have to call .setLayoutManager, but Kotlin auto-maps this to a property
     }
}

Now you should be able to run and see your list of cards if you’ve loaded a collection of WikiPage models into your currentResults property on the adapter.

Now we can also change the layoutManager property of our recycler to something that might fit our smaller cards a bit better such as the StaggeredGridLayoutManager.

article_recycler_view.layoutManager = StaggeredGridLayoutManager(2, StaggeredGridLayoutManager.VERTICAL)

This means we want 2 columns and we want to stack the cards vertically within those columns. If the direction is switched to HORIZONTAL then the number before it will represent the number of rows instead of columns.

Then with that we can have a view like this!

Screen Shot 2018-03-01 at 2.53.02 PM

And that’s pretty cool!


Also, let me know what else you’d like to learn about with Android and Kotlin! Either drop a comment here or tweet at me @Suave_Pirate!

If you like what you see, don’t forget to follow me on twitter @Suave_Pirate, check out my GitHub, and subscribe to my blog to learn more mobile developer tips and tricks!

Interested in sponsoring developer content? Message @Suave_Pirate on twitter for details.

Android Kotlin Basics – Auto-mapping Views

About This Series

This “Android Kotlin Basics” blog series is all about fundamentals. We’ll take a look at the basics of building Android apps with Kotlin from the SUPER basics, to the standard basics, to the not-so-basics. We’ll also be drawing comparisons to how things are done in Kotlin vs. Java and some other programming languages to build Android apps (like C# and Xamarin or JavaScript/TypeScript for Hybrid implementations).

Check Out the Pluralsight Course!

If you like this series, be sure to check out my course on Pluralsight – Building Android Apps with Kotlin: Getting Started where you can learn more while building your own real-world application in Kotlin along the way. You can also join the conversation and test your knowledge throughout the course with learning checks through each module!

Watch it here: https://app.pluralsight.com/library/courses/building-android-apps-kotlin-getting-started/table-of-contents

Auto-mapping Views

We’ve talked in previous posts about how awesome Kotlin is and showed off some of the great features of the language on its own, but did you know Kotlin gets even better when building Android apps?

The Problem

Let’s talk about the obnoxious pattern in Android of having to find a view from the associated layout before using it. I’m talking about this:

// java
Button myButton = (Button)findViewById(R.id.myButton);

If you’re totally new to Android development as a whole, this is what you do in your Activities, Fragments, ViewHolders, etc. to get a reference to a control on your page that was created by a layout resource. This means that if you have a page with many controls and views, you will need to execute the above style code for every single one.

What does this mean?

Your code looks gross. You have massive blocks of properties in your class and an equally massive block of findViewById in your onCreate or other lifecycle method. It also means that you query your View Object far more than you should need to. Other platforms like iOS and UWP (or any other windows app) create outlets or partial properties that hide the creation of the view in your code, but allow you to use it, which means your code stays super clean.

Because of this awful practice in Android, people have come out with some seriously helpful projects (I’m looking at you Butterknife!) and libraries that will automatically handle mapping them to properties in your Activity and Fragment classes like this:

// Java with Butterknife
class ExampleActivity extends Activity {
  @BindView(R.id.title) TextView title;
  @BindView(R.id.subtitle) TextView subtitle;
  @BindView(R.id.footer) TextView footer;

  @Override public void onCreate(Bundle savedInstanceState) {
    super.onCreate(savedInstanceState);
    setContentView(R.layout.simple_activity);
    ButterKnife.bind(this);
    // TODO Use fields...
  }
}

That’s a little better, but still a lot of wire up before you can even use the controls in your code.

Kotlin to the Rescue

Kotlin, I cannot thank you enough for doing this…

Kotlin created an Android extension that allows for your Activities to auto-map their layout views by their id in to useable controls!

Here’s how it works: Let’s say you have a layout resource that looks like this:

activity_example.xml


In your Activity, you simply need to import the extension, and your Activity will automatically have a property it can use that will be pulled from the layout file:

import kotlinx.android.synthetic.main.activity_example.*

class ExampleActivity: Activity() {
    override fun onCreate(savedInstance: Bundle?) {
        setContentView(R.layout.activity_example)
        detailTextView.text = "my new text that was set when auto-mapping"
    }
}

Beyond making the code so much cleaner, this Kotlin Android Plugin also uses built in caching of the views it finds in order to avoid re-querying the View Object since it can be cumbersome and slow.

For more details on how to customize this behavior, and use the extension more in depth, check out Kotlin’s documentation on it here: https://kotlinlang.org/docs/tutorials/android-plugin.html

Also, let me know what else you’d like to learn about with Android and Kotlin! Either drop a comment here or tweet at me @Suave_Pirate!

If you like what you see, don’t forget to follow me on twitter @Suave_Pirate, check out my GitHub, and subscribe to my blog to learn more mobile developer tips and tricks!

Interested in sponsoring developer content? Message @Suave_Pirate on twitter for details.